
Bill Pay Service
Step-By-Step Guide
New and improved look and design for existing Bill Pay users starts NOW!
Select each topic for a step-by-step guide for navigating RRCU's Bill Pay.
-
New Bill Pay User Setup
Want to get started paying bills directly from your RRCU account? You're in the right place!
Follow these quick and easy steps to get started:
1. Log in to your RRCU account through Online Banking or the RRCU Mobile Banking App.
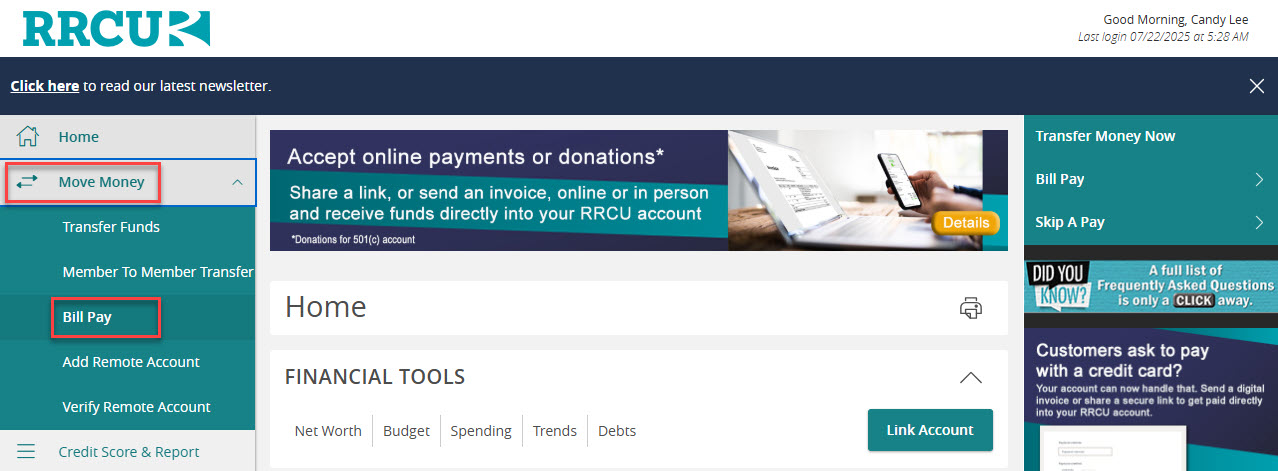
2. Click the Move Money menu tab.
3. Click the Bill Pay option.
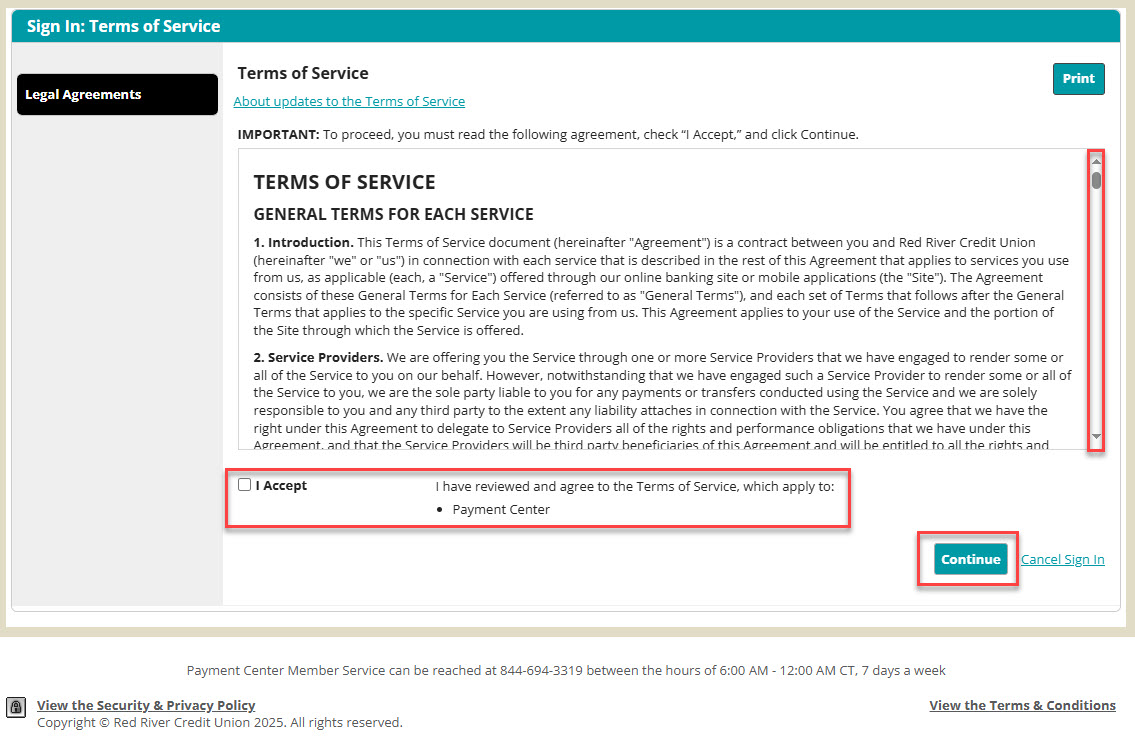
4. Read the Terms of Service and, if you agree, check "I Accept", then the Continue button.
![New Bill Pay User Access]()
![Review Bill Pay Terms]()
-
Add a Bill using Bill Pay Discovery
Bill Pay Discovery makes it easy to discover and add billers. Just a few clicks and bills are ready to be managed and paid!
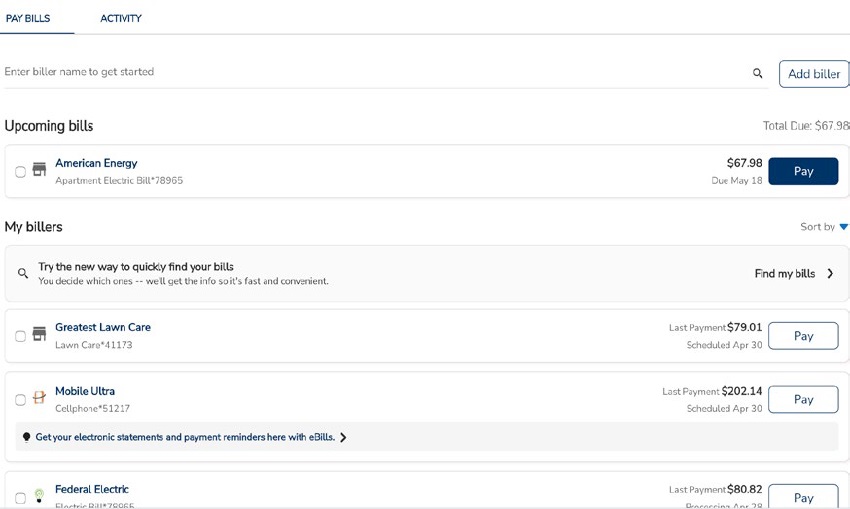
Desktop View 1. From the payment center, click “Find my bills” to quickly add billers.
![Adding a bill with Bill Pay Discovery]()
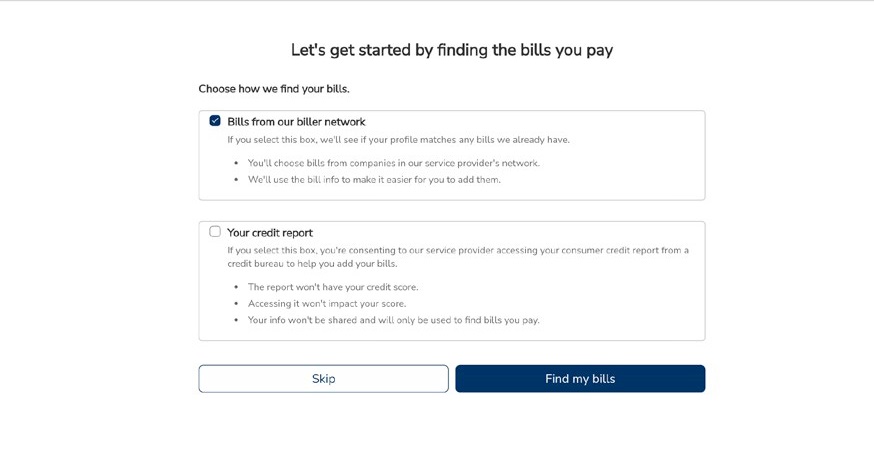
2. You can search for “Bills from our biller network” and/or “Your credit report.”
3. Make your choice, then select “Find my bills.”![Add a bill using Bill Pay Discovery]()
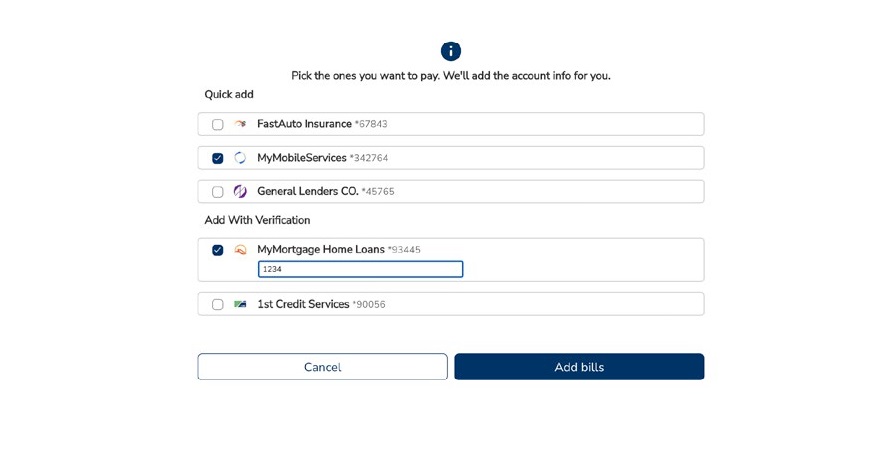
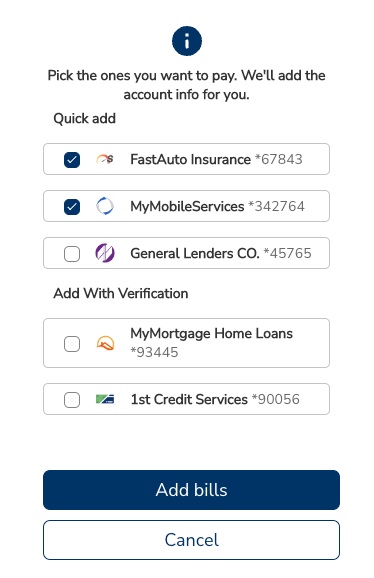
4. Select the billers you want to add to your biller list.
5. Click “Add bills.”
6. If your biller is not listed, select “Cancel” to return to the payment center and then select “Add biller.”![Add a bill using Bill Pay Discovery]()
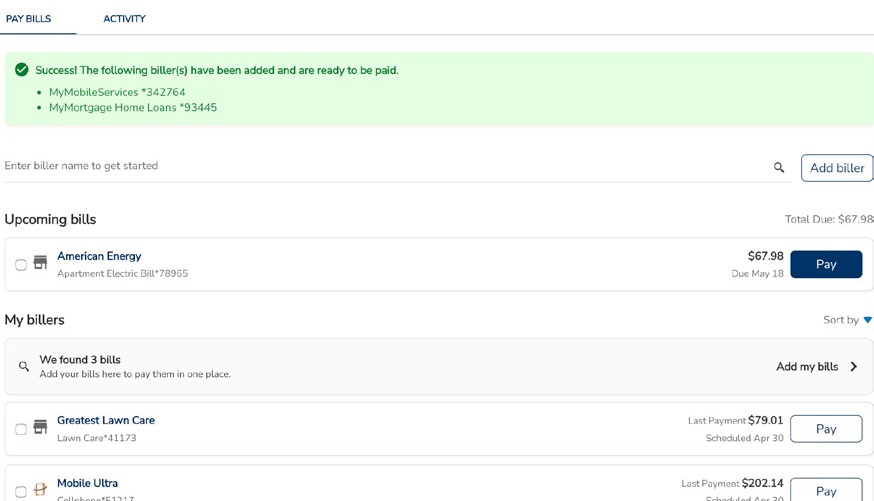
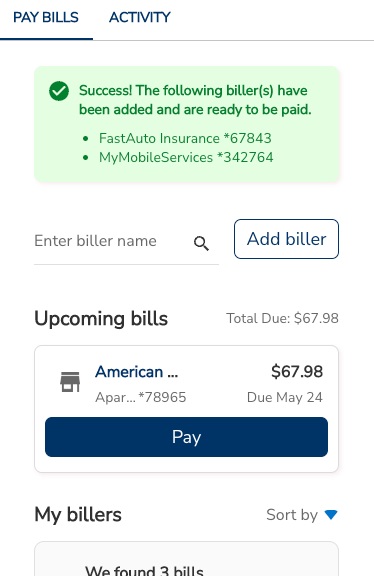
7. You will see a confirmation of the billers you have added. You are now ready to pay your bills!
![Add a bill using Bill Pay Discovery]()
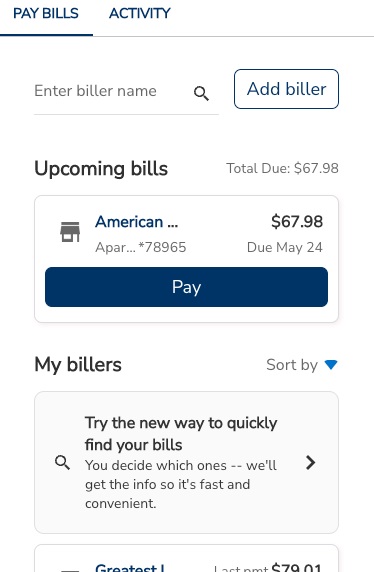
Mobile View 1. From the payment center, click “Find my bills” to quickly add billers.
![Add a bill using Bill Discovery]()
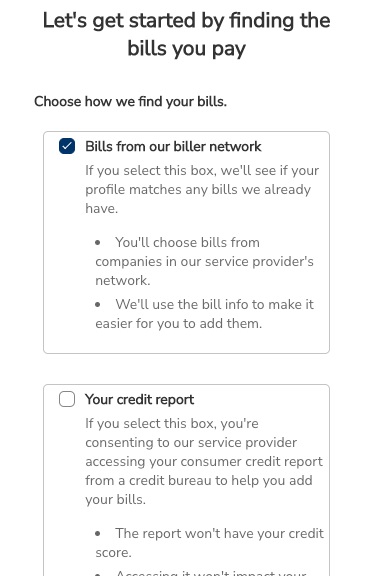
2. You can search for “Bills from our biller network” and/or “Your credit report.”
3. Make your choice, then select “Find my bills.”![Add a bill using Bill Pay Discovery]()
4. Select the billers you want to add to your biller list.
5. Click “Add bills.”
6. If your biller is not listed, select “Cancel” to return to the payment center and then select “Add biller.”![Add a bill using Bill Pay Discovery]()
7. You will see a confirmation of the billers you have added. You are now ready to pay your bills!
![Add a bill using Bill Pay Discovery]()
-
Adding a Bill
Bill Pay is an easy way to manage and pay bills all from the same convenient place with one password to remember.
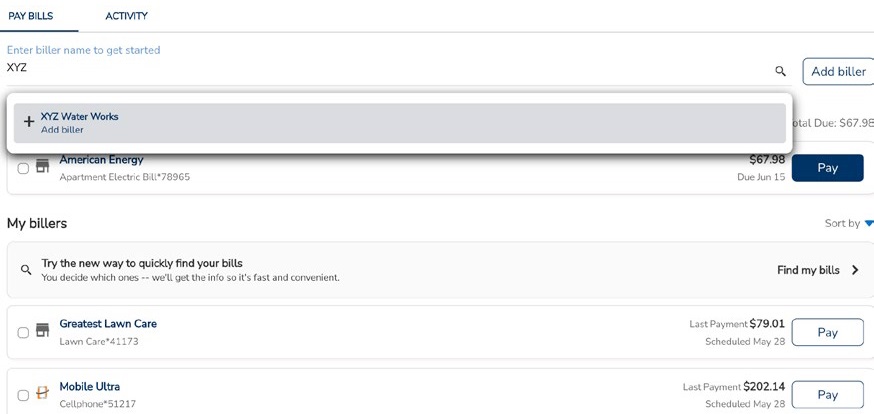
Desktop View 1. Start by entering the biller’s name. If the biller is already in the system, select + (biller name) Add biller from the pop-up screen.
![Add a bill using Bill Pay]()
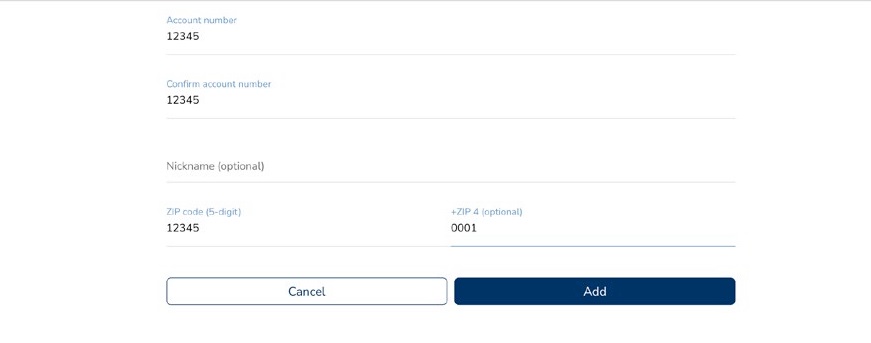
2. Enter and confirm your Account number and ZIP code. Select “Add.”
![Add a bill using Bill Pay]()
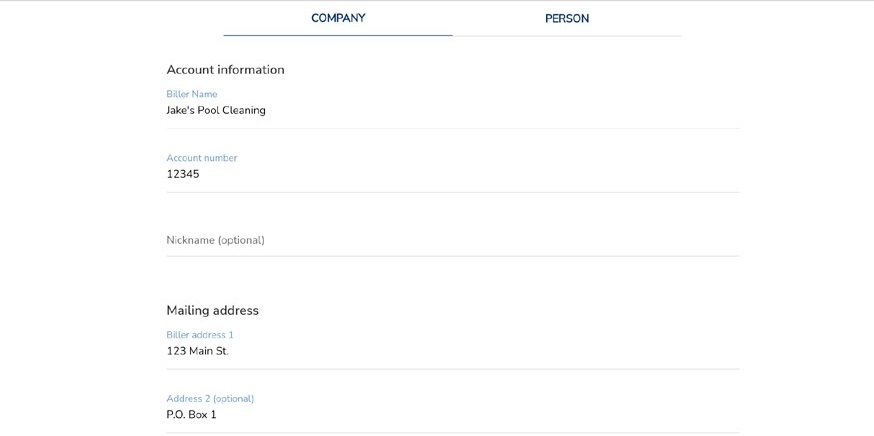
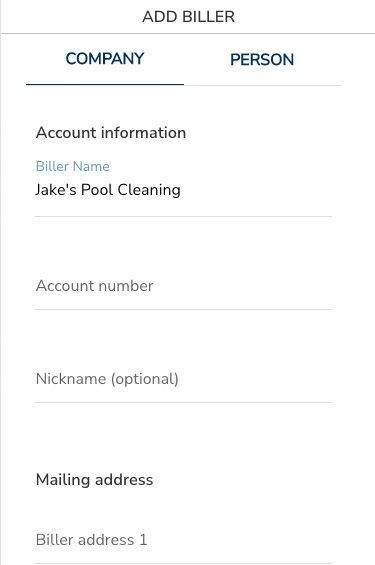
3. If your biller was not in our system, you will be asked to select whether the biller is a Company or Person. Enter the biller’s information and select “Add.”
![Add a bull using Bill Pay]()
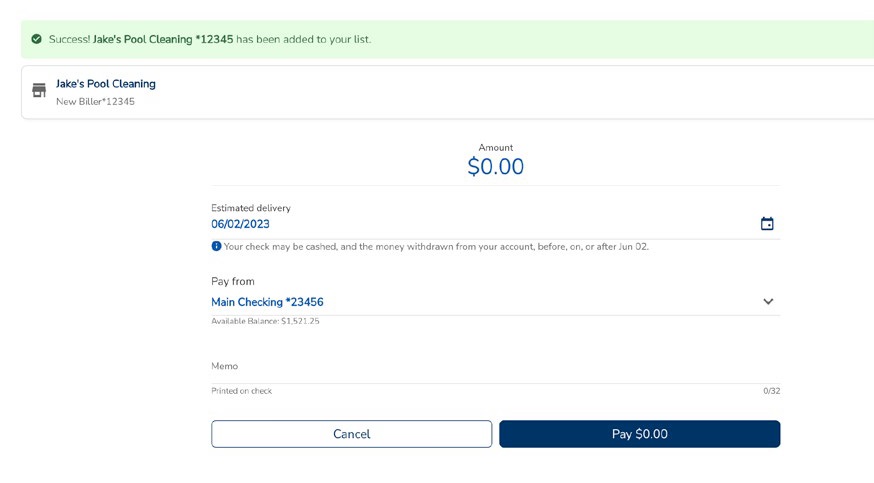
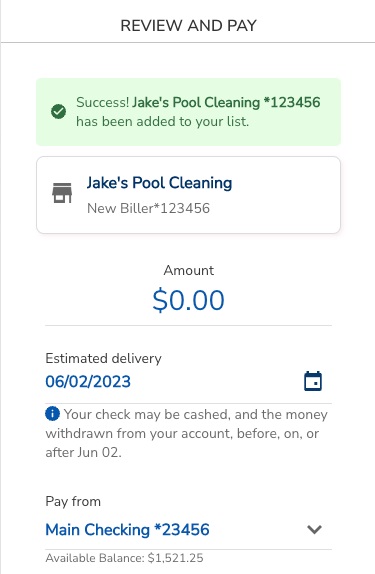
4. You are now ready to pay the newly added biller.
![Add a bill using Bill Pay]()
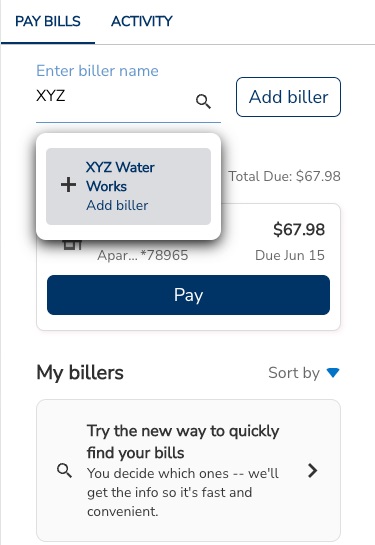
Mobile View 1. Start by entering the biller’s name. If the biller is already in the system, select + (biller name) Add biller from the pop-up screen.
![Add a bill using Bill Pay]()
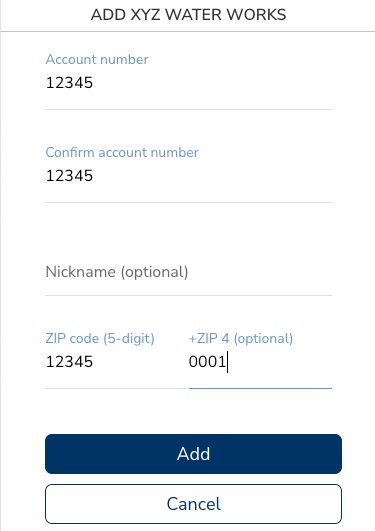
2. Enter and confirm your Account number and ZIP code. Select “Add.”
![Add a bill using Bill Pay]()
3. If your biller was not in our system, you will be asked to select whether the biller is a Company or Person. Enter the biller’s information and select “Add.”
![Add a bill using Bill Pay]()
4. You are now ready to pay the newly added biller.
![Add a bill using Bill Pay]()
-
Paying a Bill
Bill Pay makes it easy to organize and pay bills. No more stamps. No more trips to the branch or the ATM.
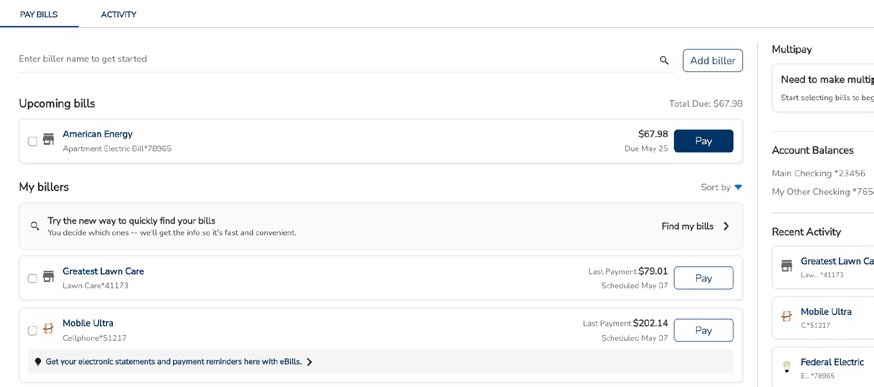
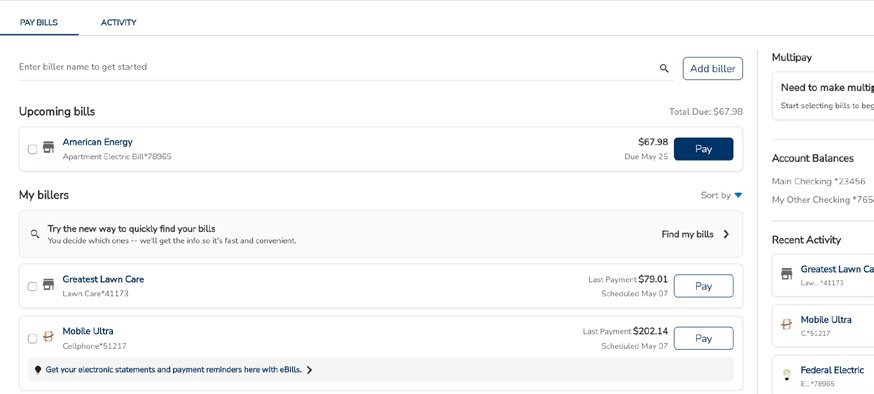
Desktop View 1. Once you have added a biller, you can start paying your bills. Locate the biller in the My billers list and select “Pay.”
![Pay a bill using Bill Pay]()
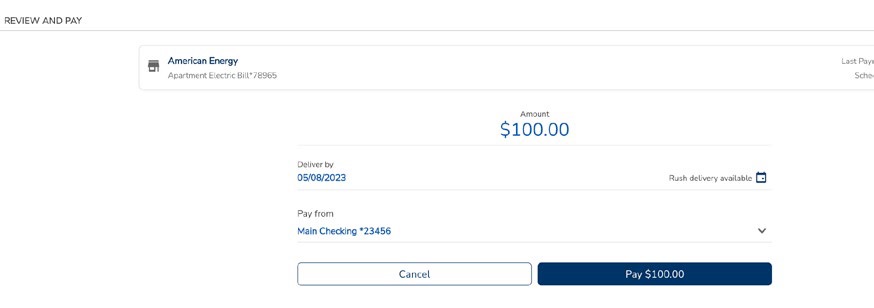
2. Enter the amount.
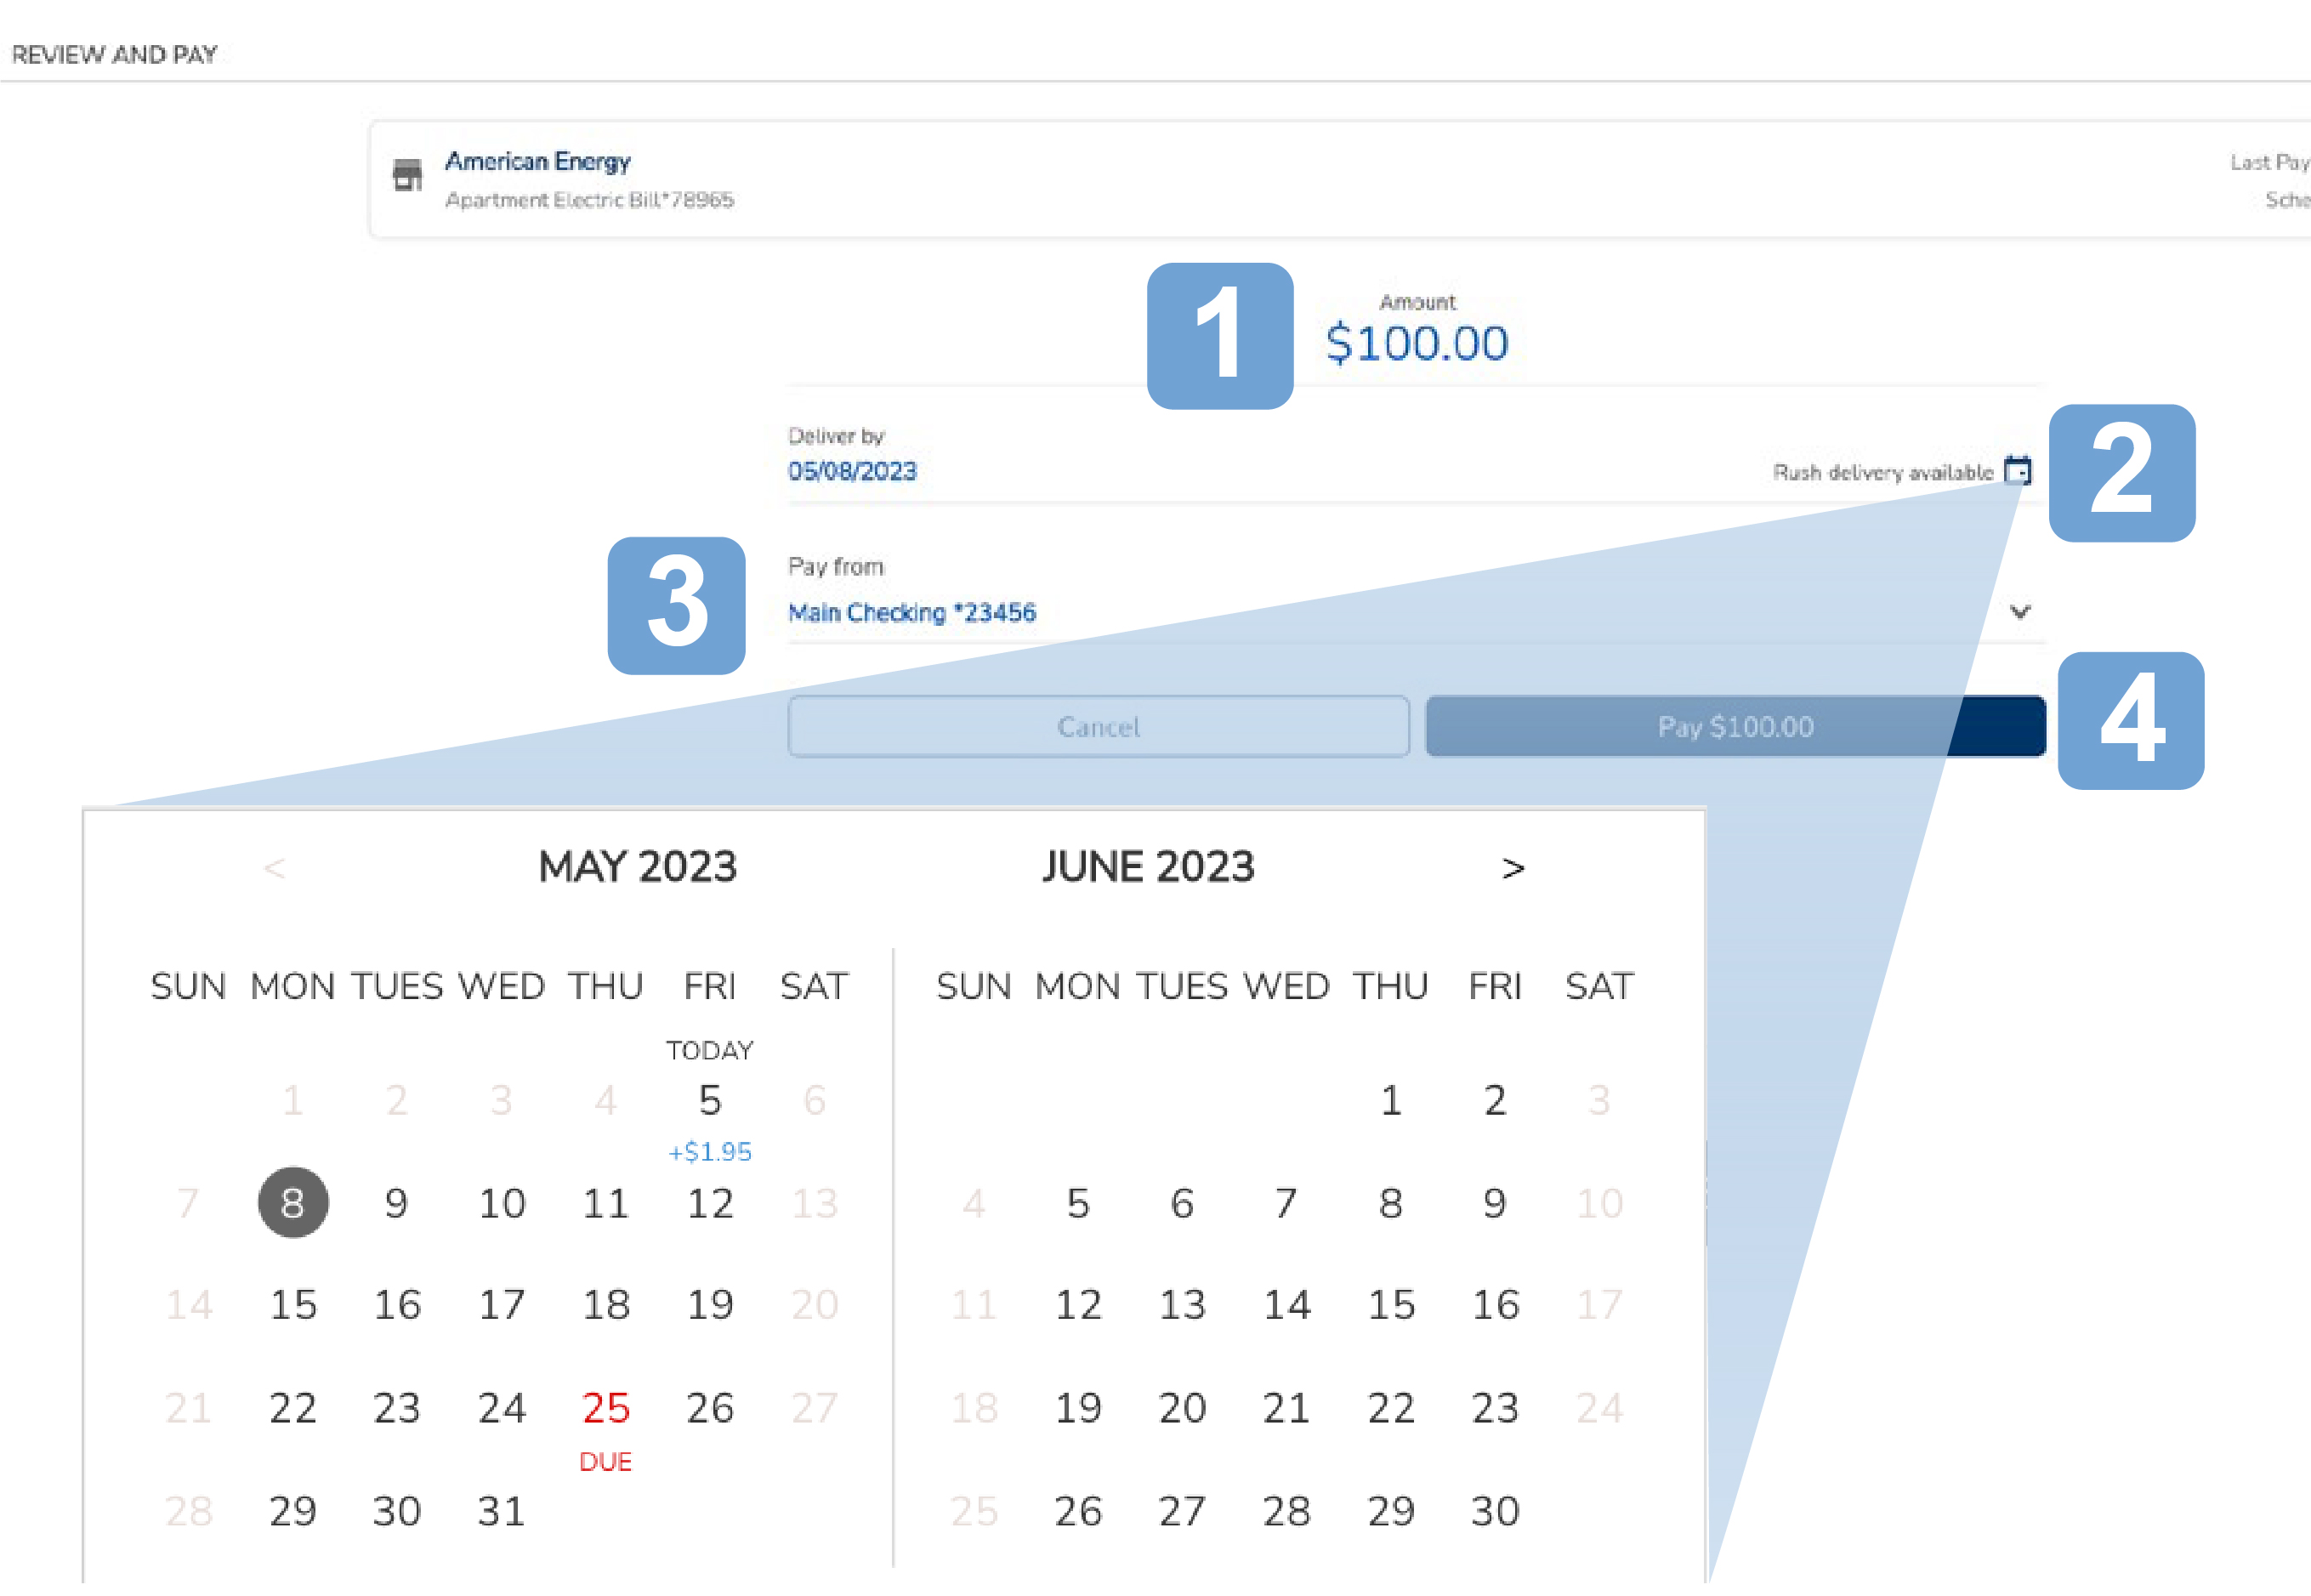
3. Select the Deliver by date by clicking on the calendar icon. If available, a rush payment date can be selected for a fee.
4. Choose the Pay from account.
5. Select the “Pay $(amount)” button.![Pay a bill using Bill Pay]()
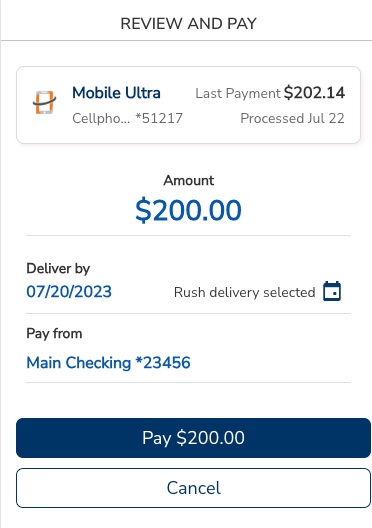
6. Review your bill payment details. If everything is correct, select “Pay $(amount).”
![Pay a bill using Bill Pay]()
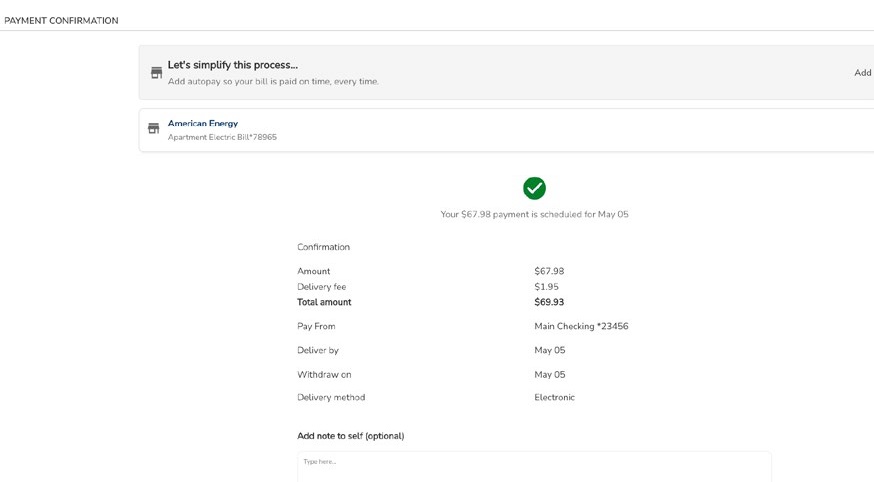
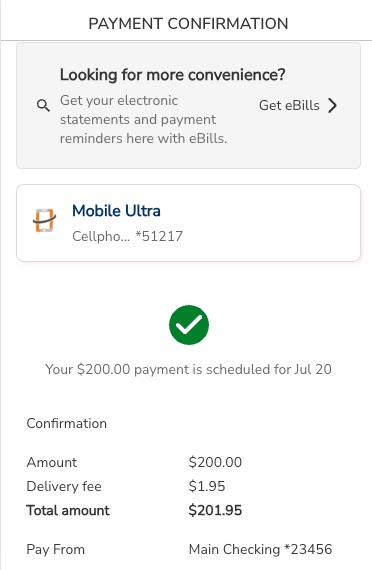
7. On the Payment Confirmation screen, you have several options:
a. Add this bill as an automated payment.
b. Add notes to self.
c. Save the confirmation receipt.
d. Select “Done” to return to the payment center.
![Pay a bill using Bill Pay]()
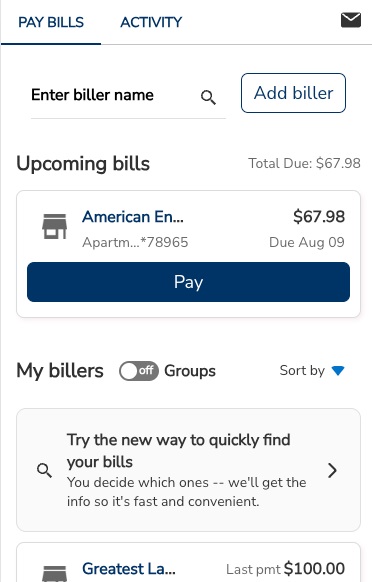
Mobile View 1. Once you have added a biller, you can start paying your bills. Locate the biller in the My billers list and select “Pay.”
![Pay a bill using Bill Pay]()
2. Enter the amount.
3. Select the Deliver by date by clicking on the calendar icon. If available, a rush payment date can be selected for a fee.
4. Choose the Pay from account.
5. Select the “Pay $(amount)” button.
![Pay a bill using Bill Pay]()
6. Review your bill payment details. If everything is correct, select “Pay $(amount).”
![Pay a bill using Bill Pay]()
7. On the Payment Confirmation screen, you have several options:
a. Add this bill as an automated payment.
b. Add notes to self.
c. Save the confirmation receipt.
d. Select “Done” to return to the payment center.
![Pay a bill using Bill Pay]()
-
Make a Rush Payment
When a payment is due now, rush payments allow bills to be scheduled and paid in the same day for a small fee.
Desktop View Once you have added a biller, you can start paying your bills. Locate the biller in the My billers list and select “Pay.”
![Make a rush payment using Bill Pay]()
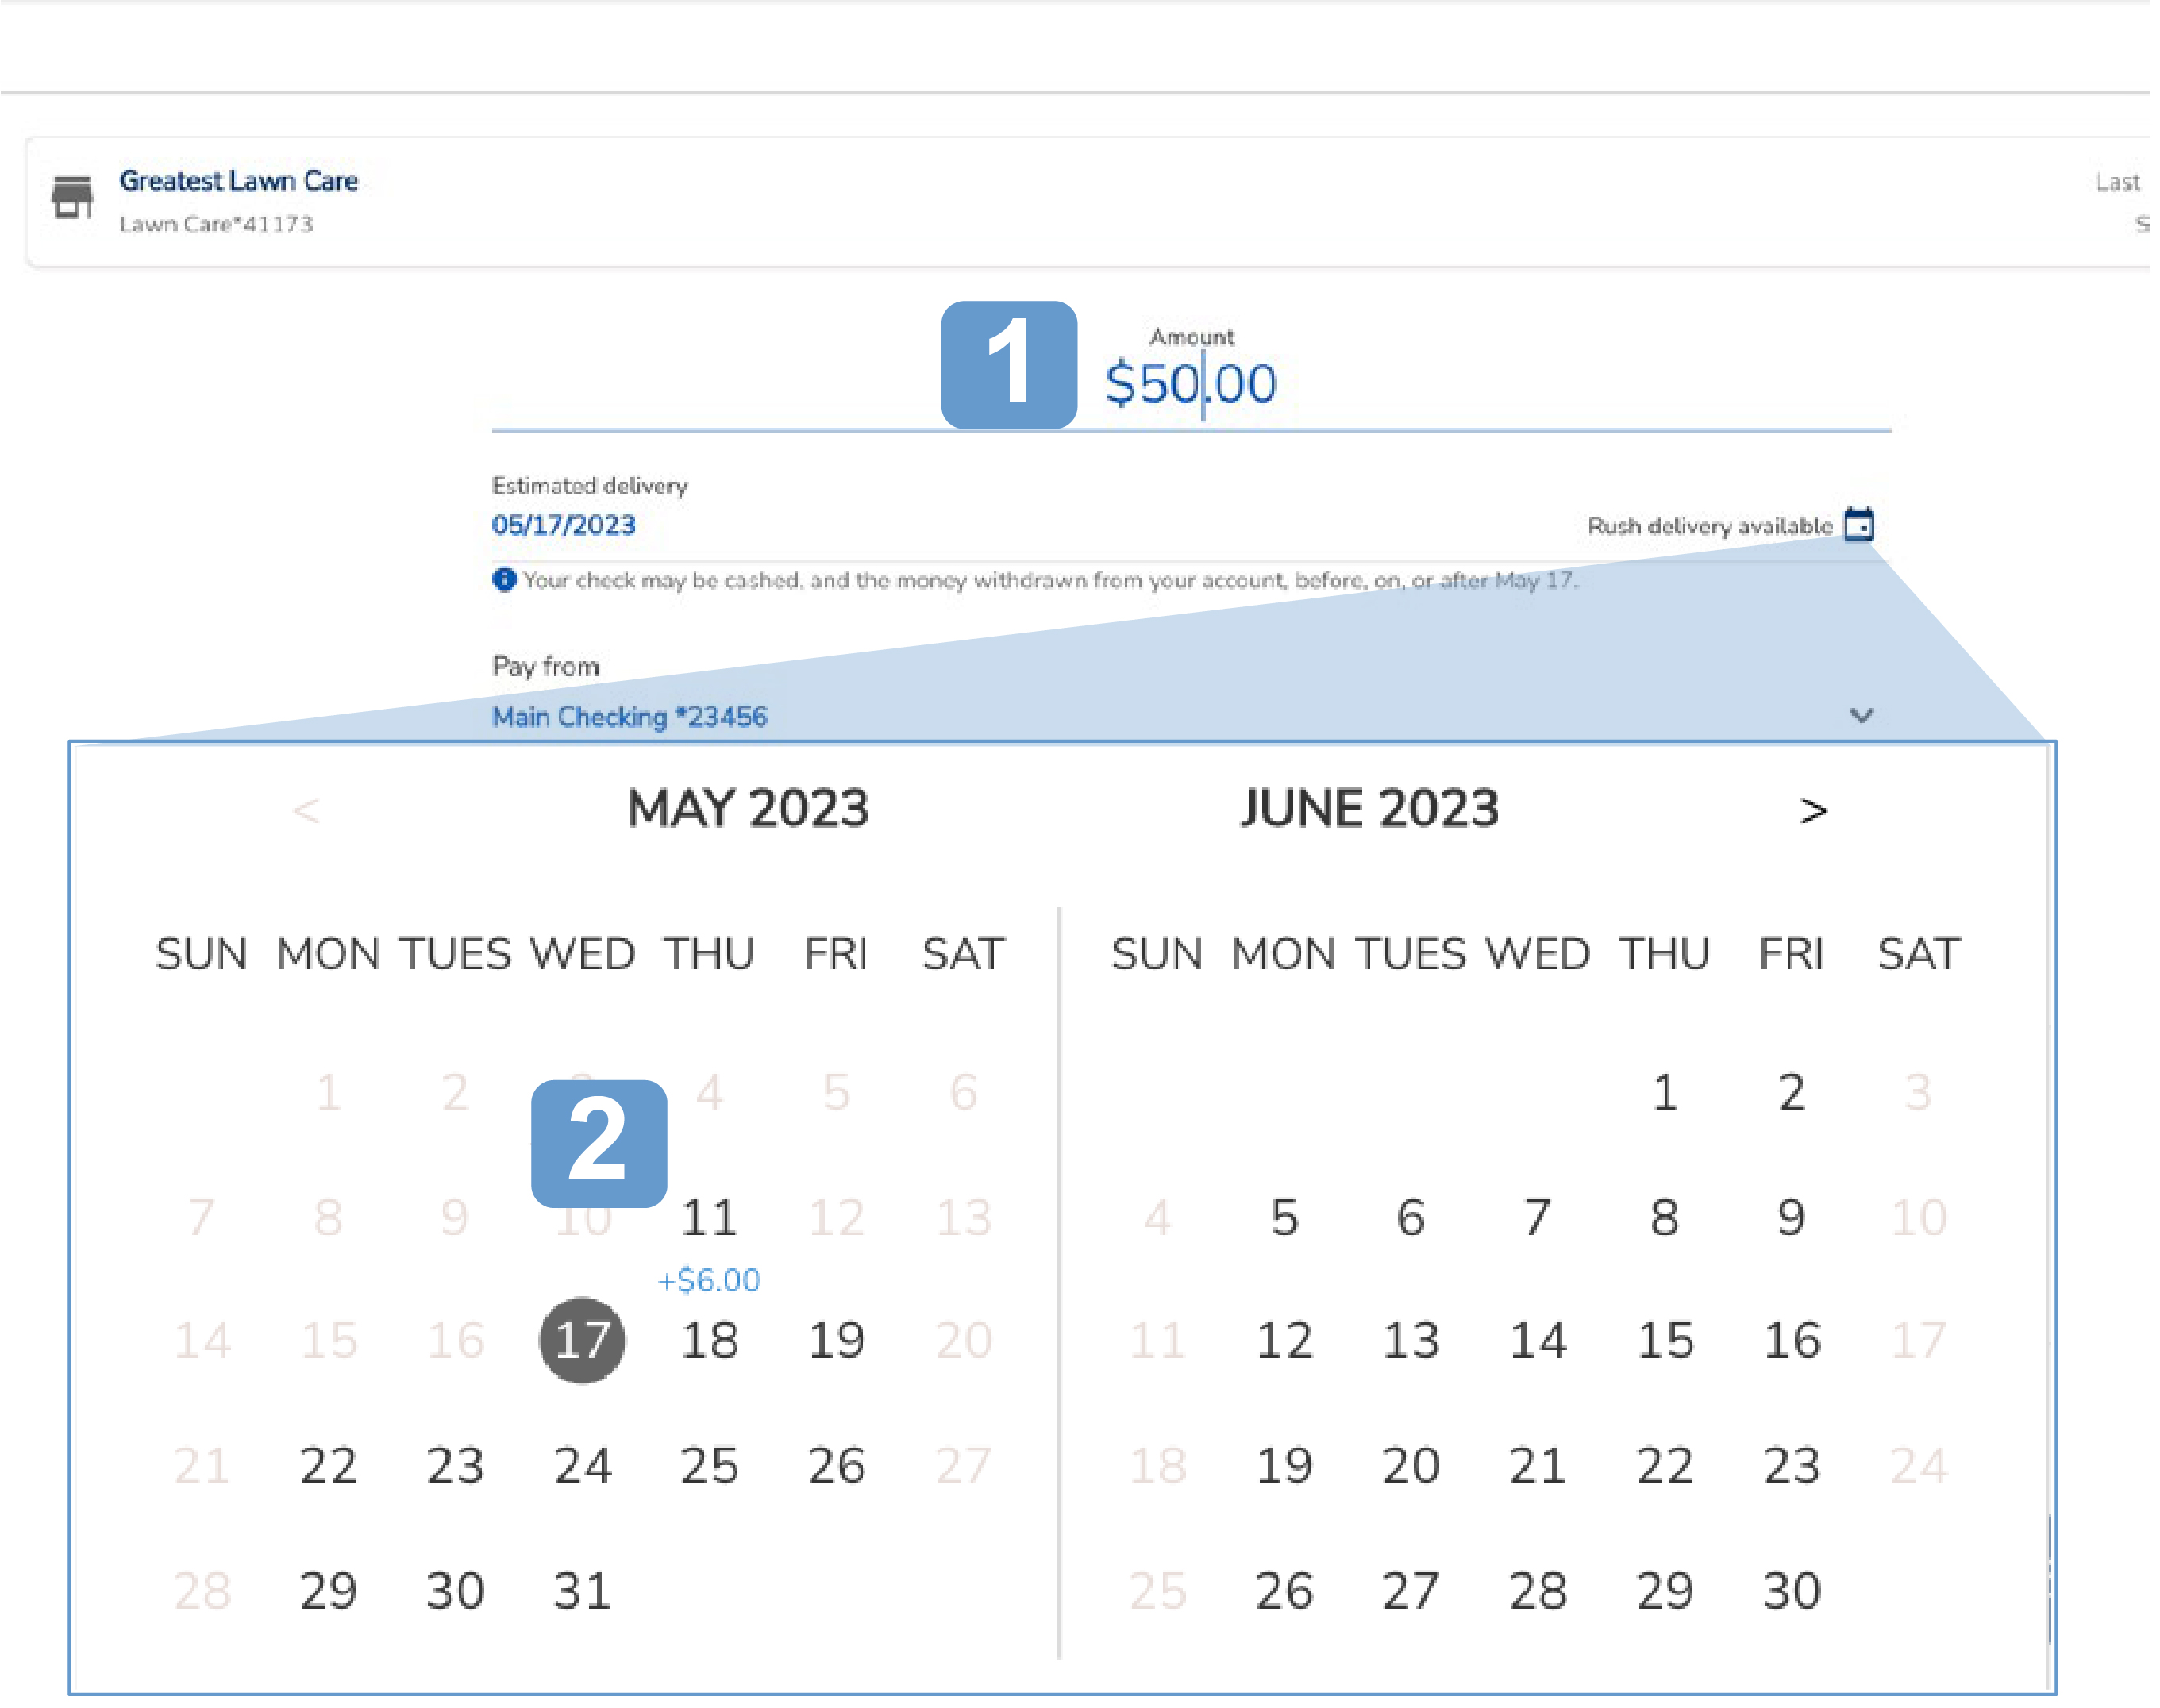
1. Enter the amount.
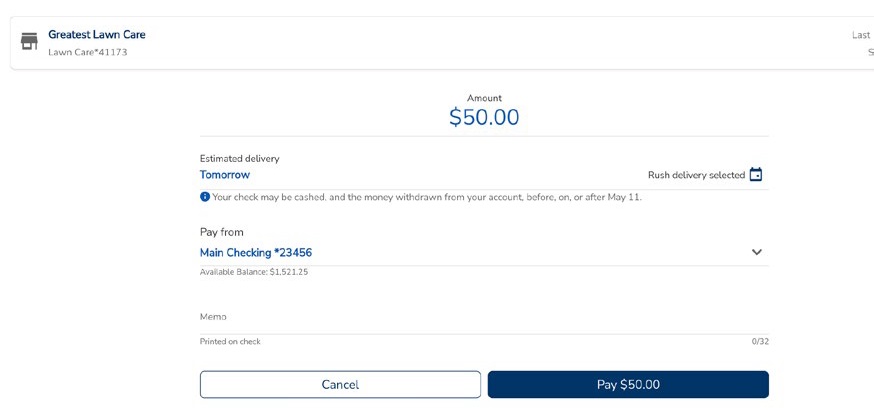
2. Select the Deliver by date by clicking on the calendar icon. If a rush payment date is available, it will show a fee below the date.![Make a Rush Payment using Bill Pay]()
3. Review the payment information. If everything is correct, select “Pay $(amount).”
![Make a rush payment using Bill Pay]()
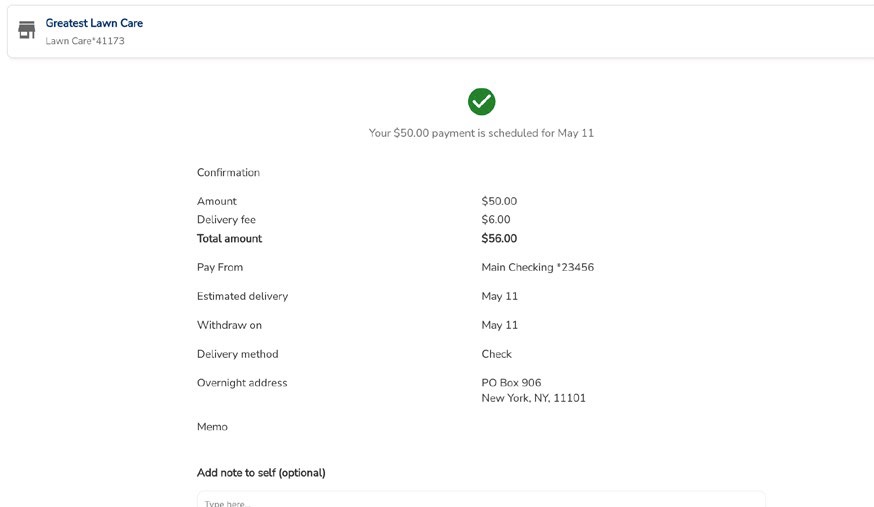
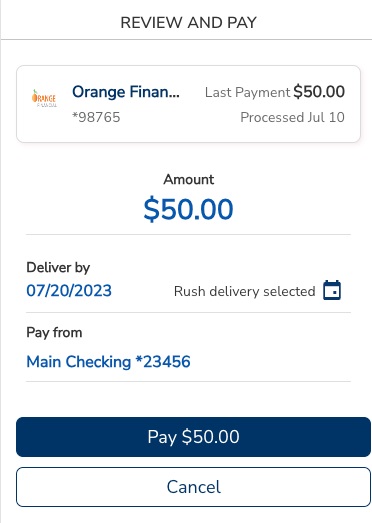
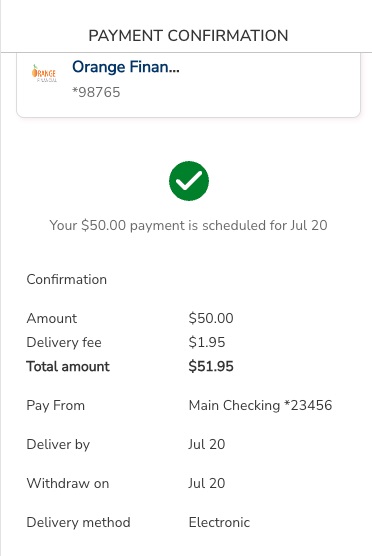
The payment confirmation displays all the details of your payment, including the delivery fee for the rush payment.
![Make a rush payment using Bill Pay]()
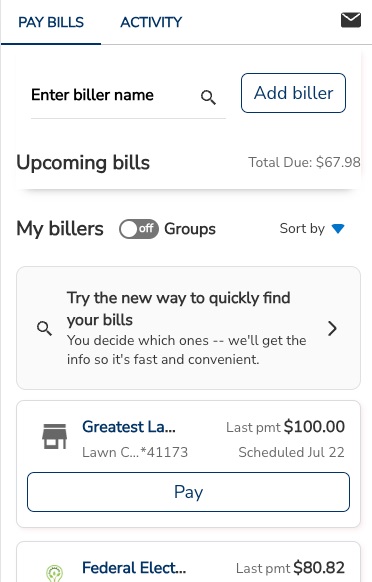
Mobile View Once you have added a biller, you can start paying your bills. Locate the biller in the My billers list and select “Pay.”
![Make a rush payment using Bill Pay]()
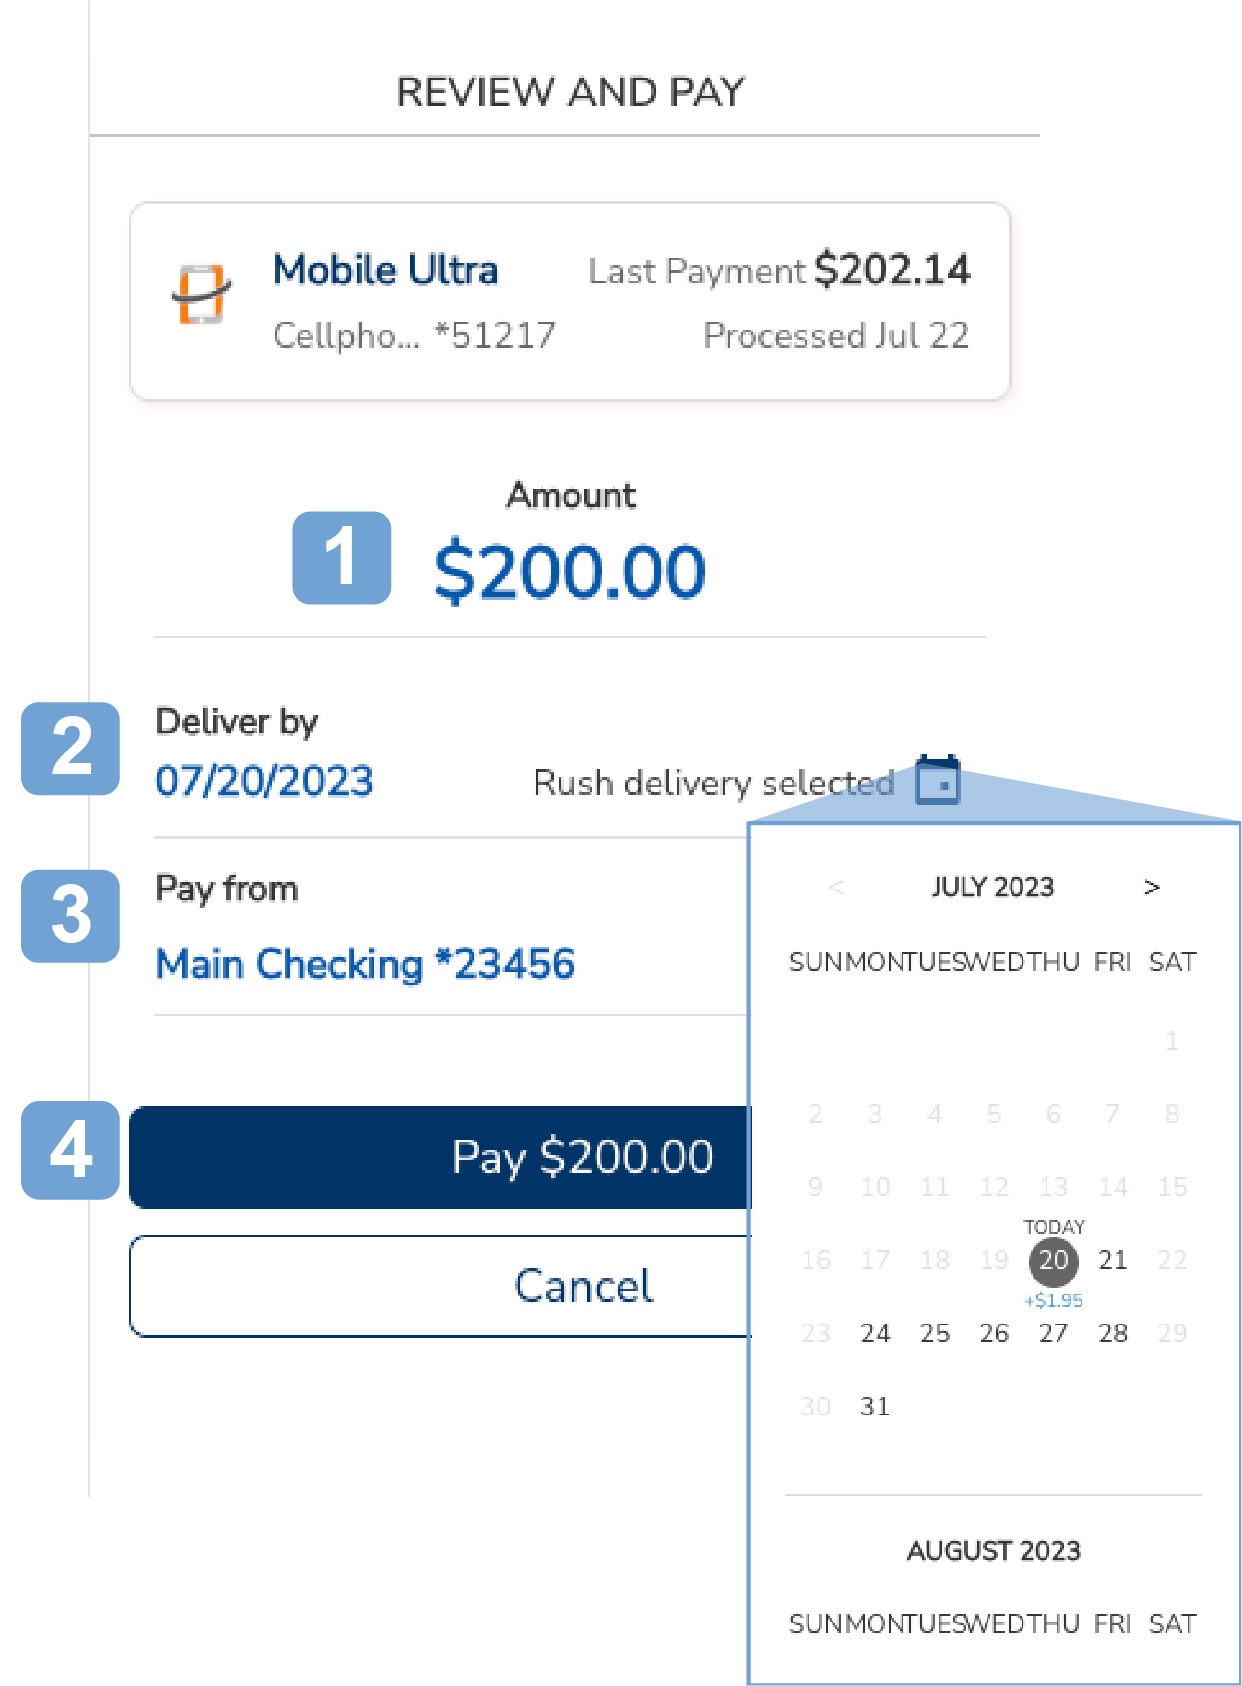
1. Enter the amount.
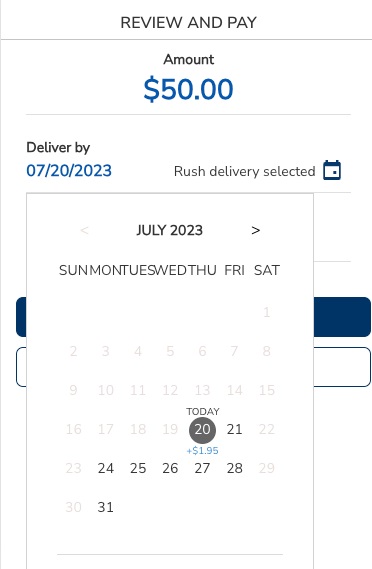
2. Select the Deliver by date by clicking on the calendar icon. If a rush payment date is available, it will show a fee below the date.![Make a rush payment using Bill Pay]()
3. Review the payment information. If everything is correct, select “Pay $(amount).”
![Make a rush payment using Bill Pay]()
The payment confirmation displays all the details of your payment, including the delivery fee for the rush payment.
![Make a rush payment using Bill Pay]()
-
Set up Bill Reminders
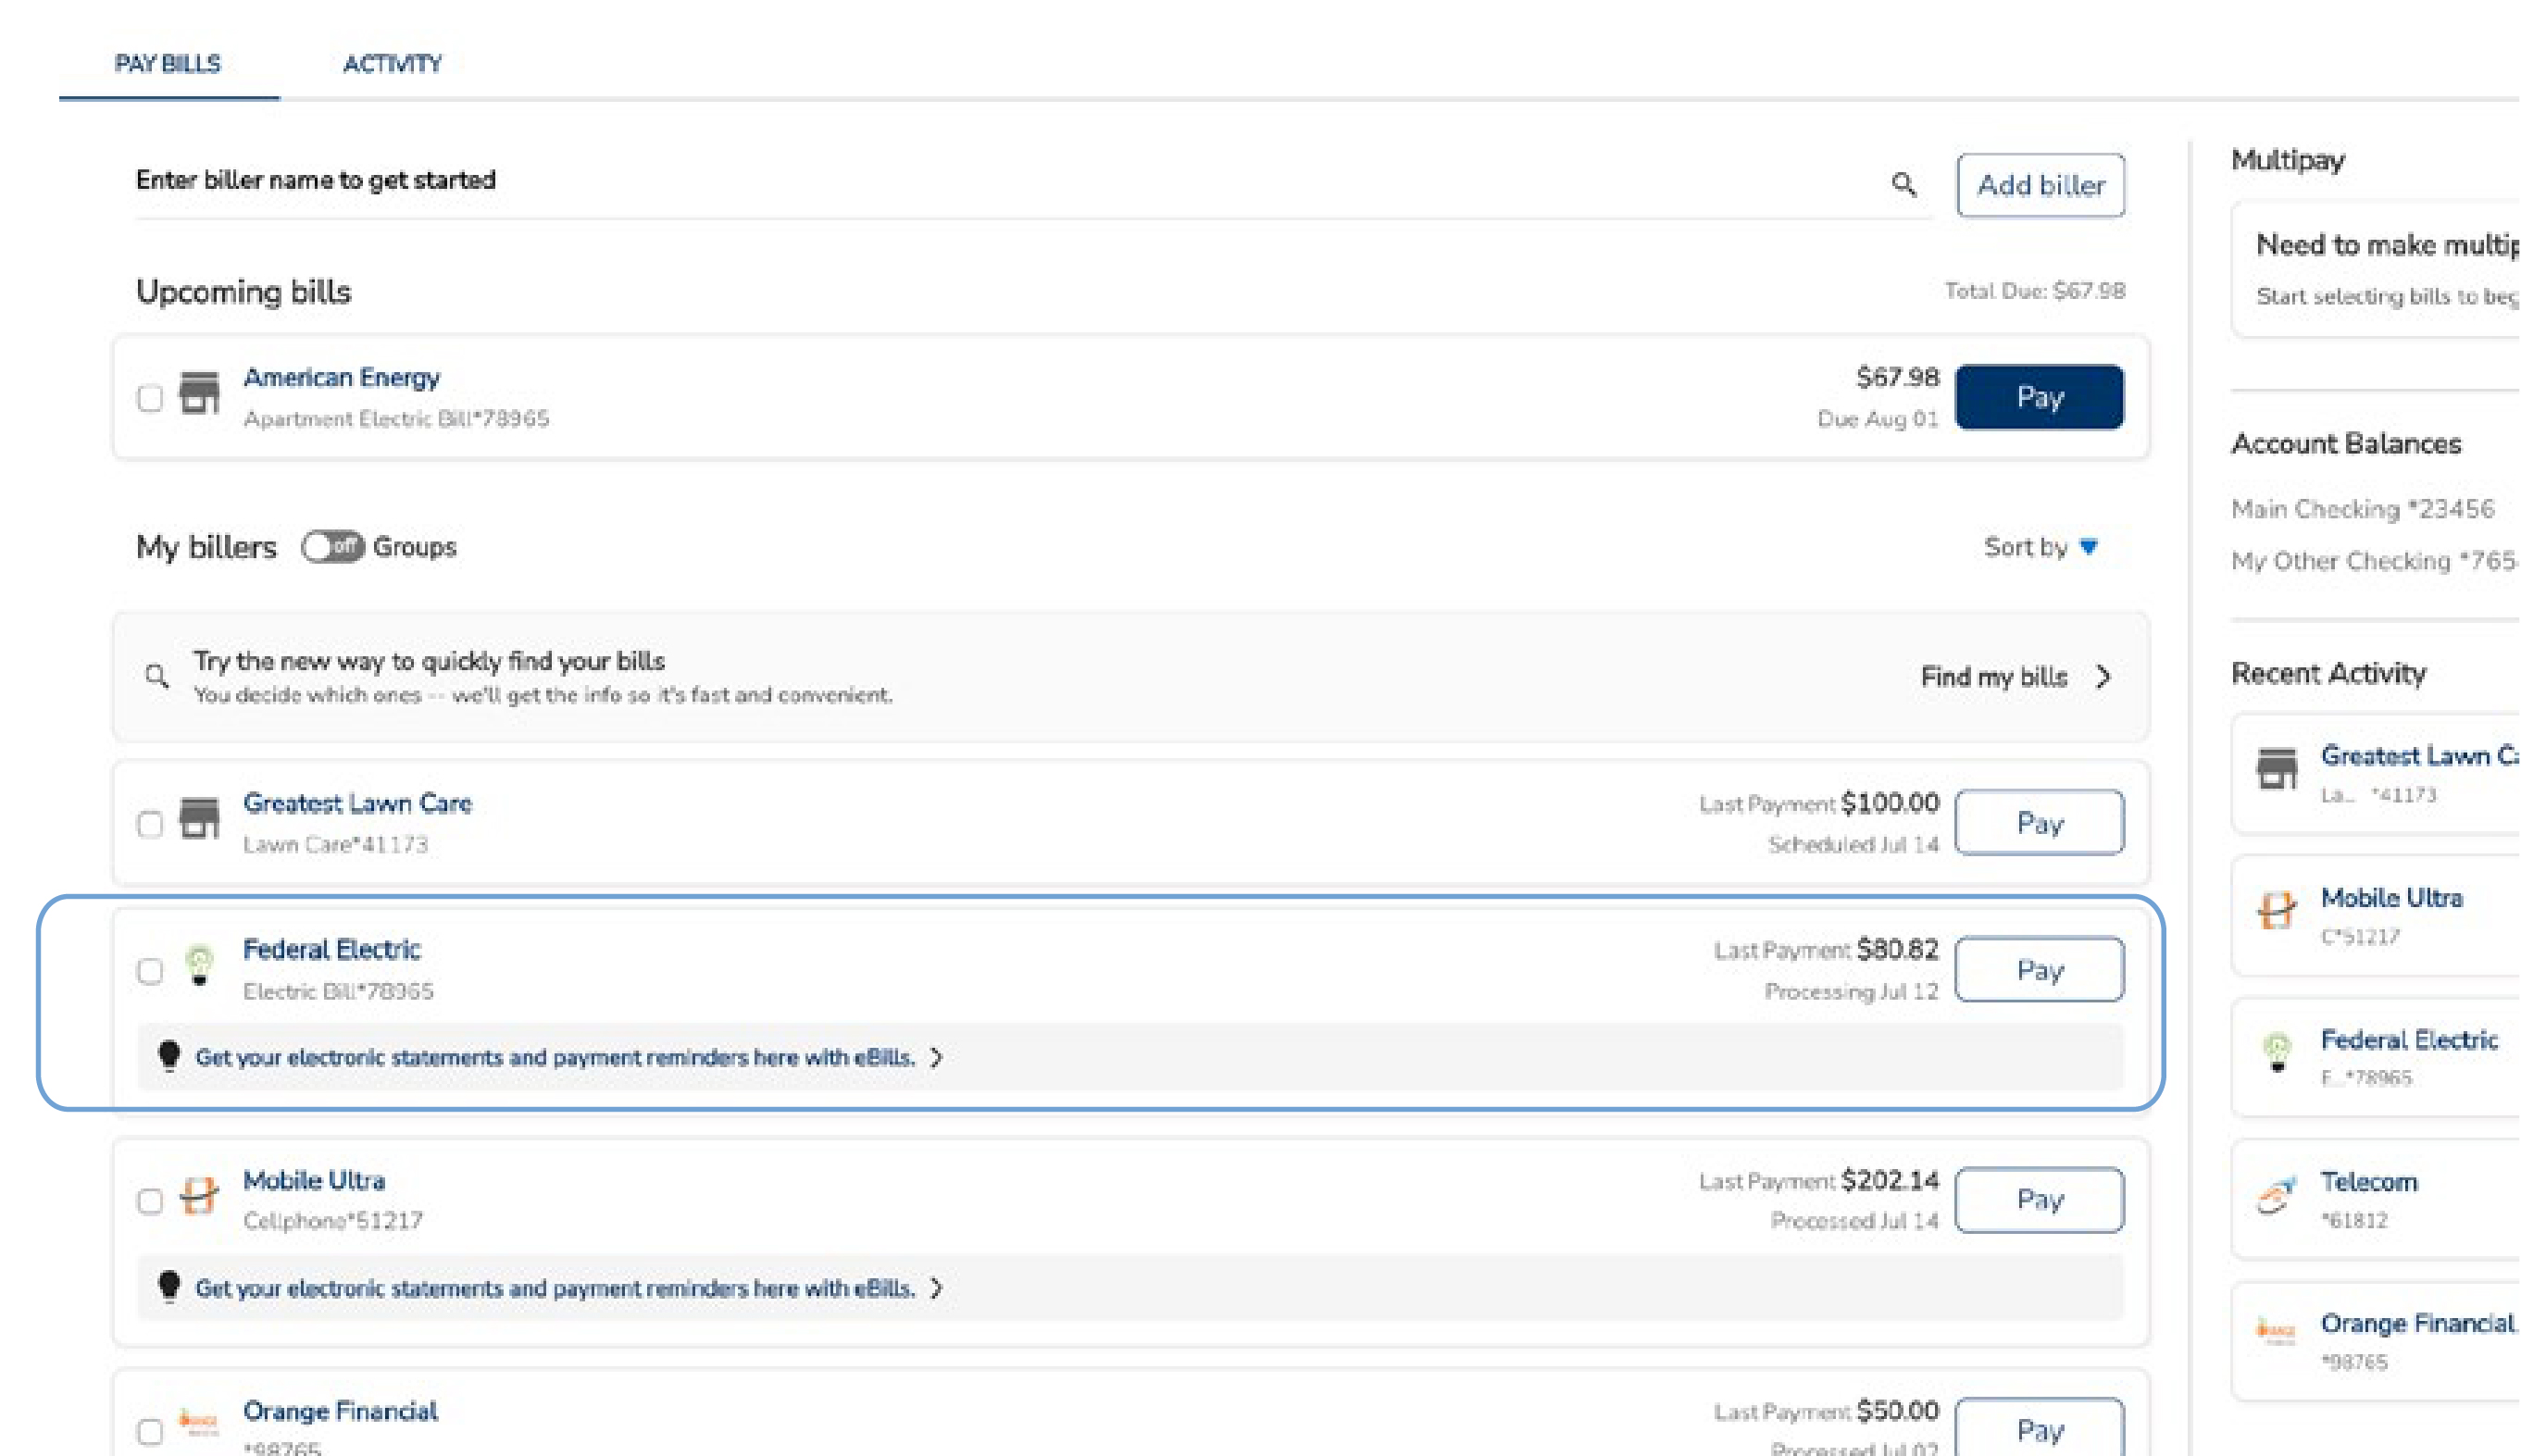
Sometimes we can use a little reminder. Bill reminders are easy to set up and help us remember those important due dates.
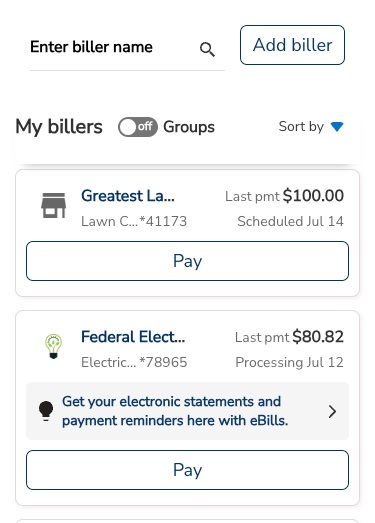
Desktop View 1. Select a biller from “My billers” that does not already have eBills or Autopay set up.
![Add a Bill Reminder using Bill Pay]()
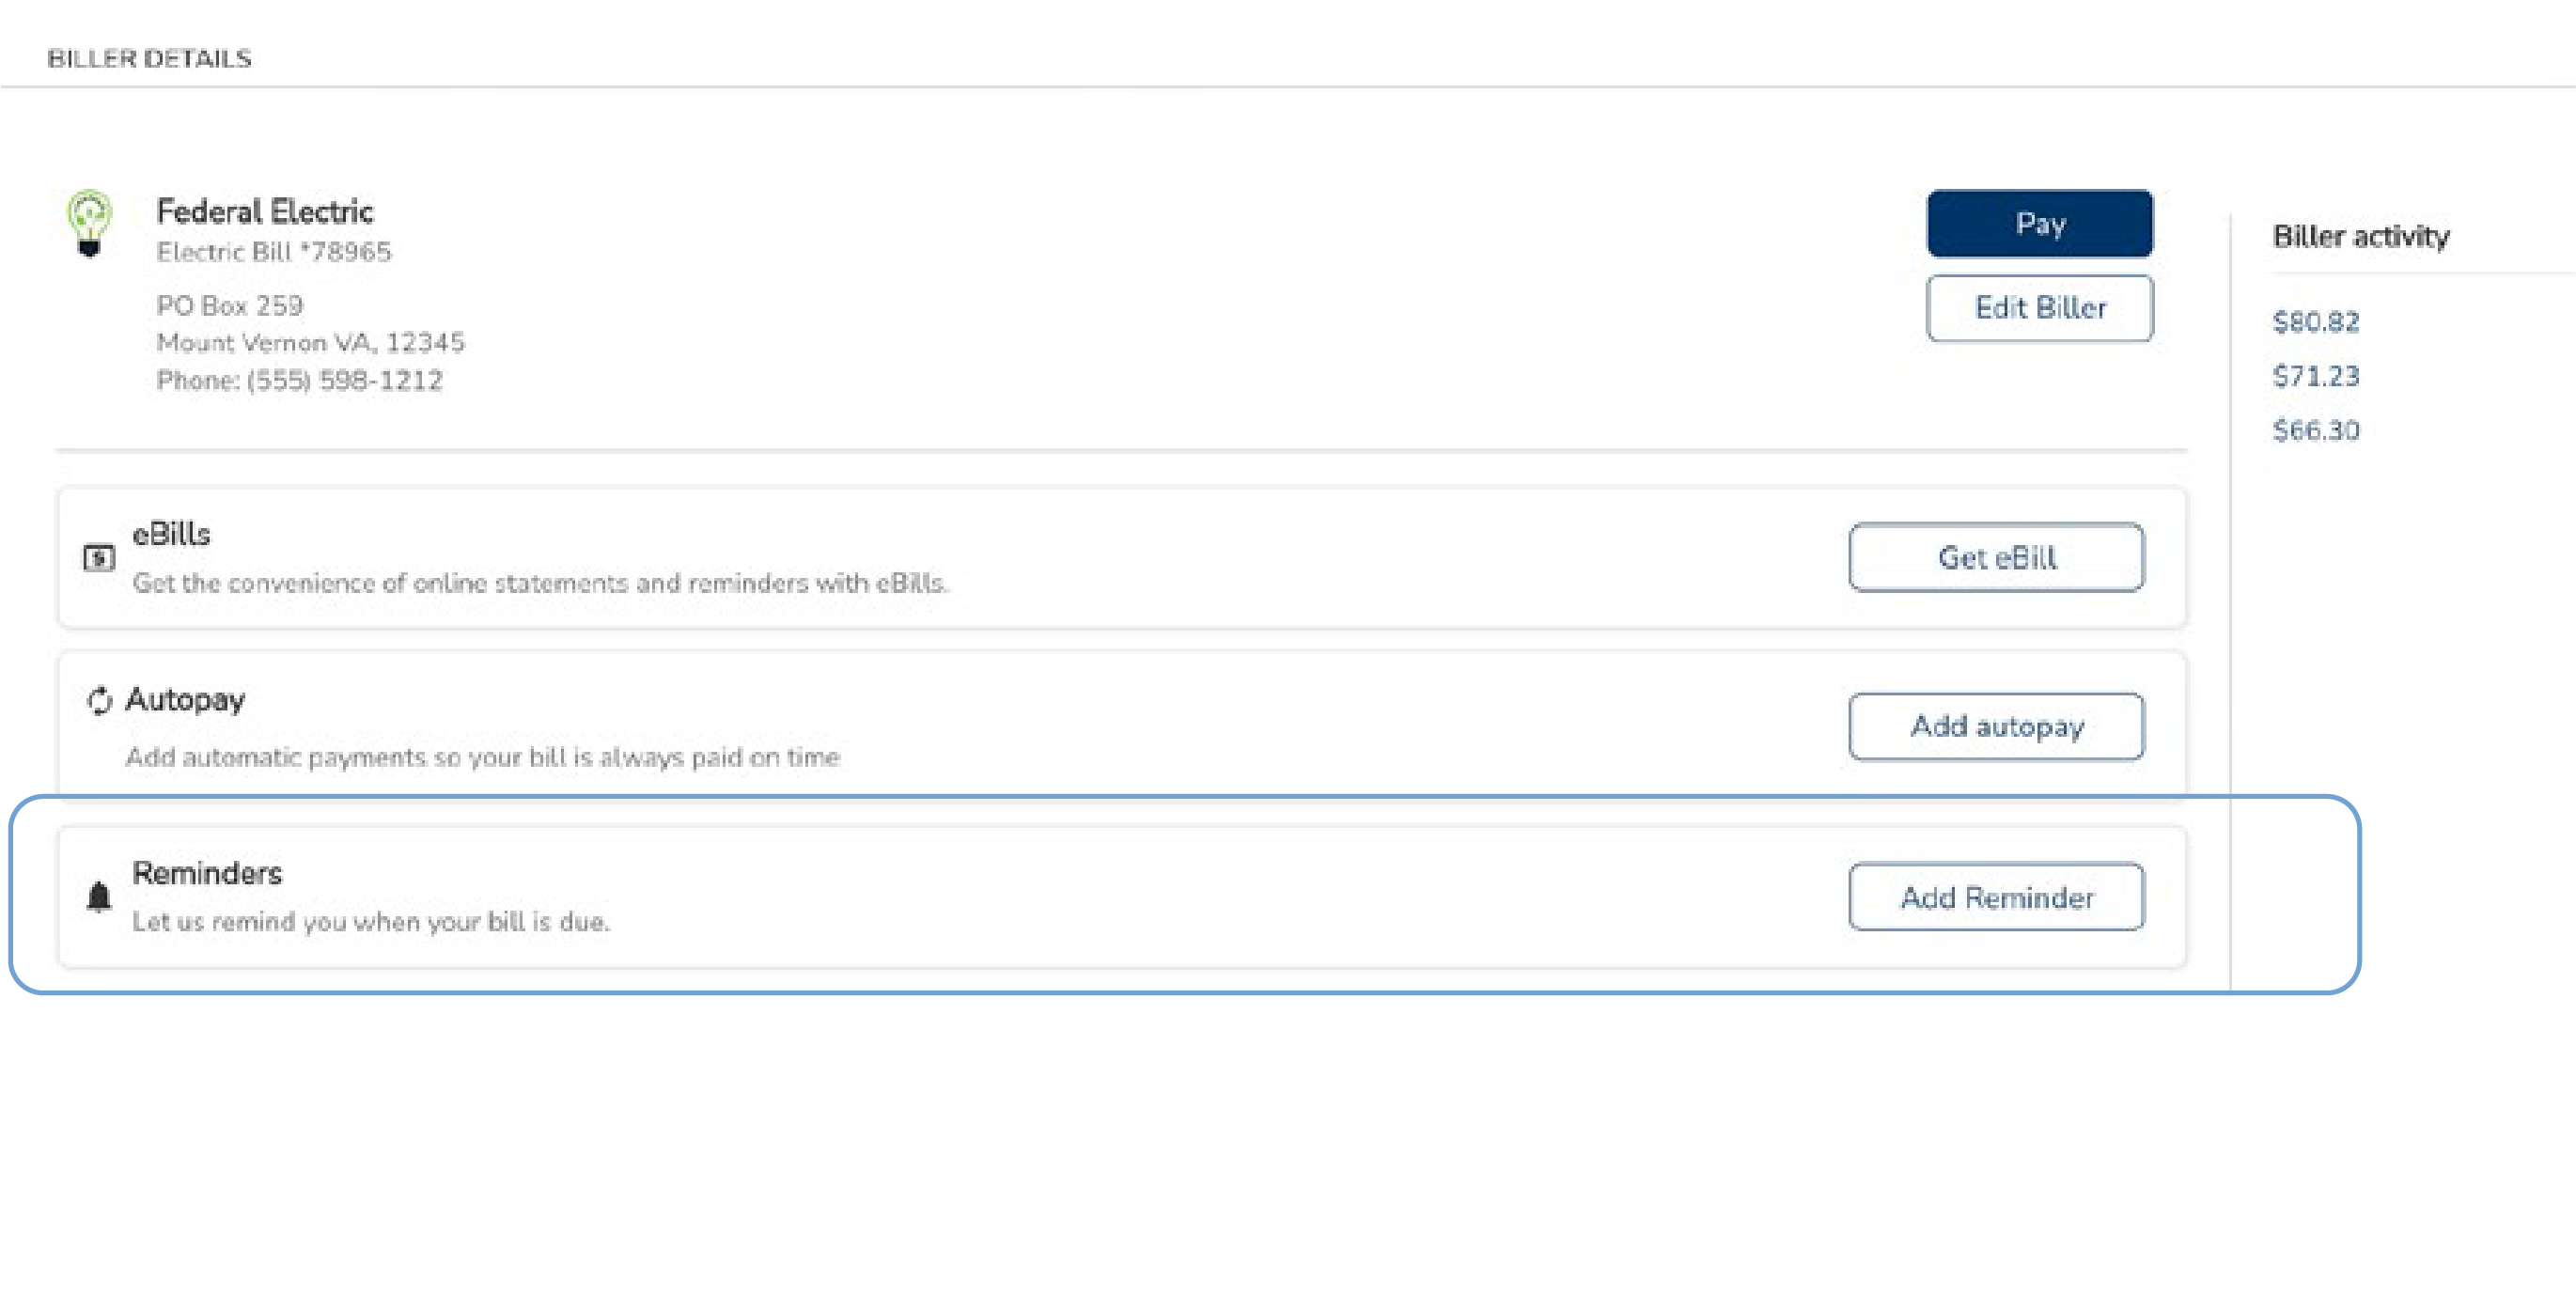
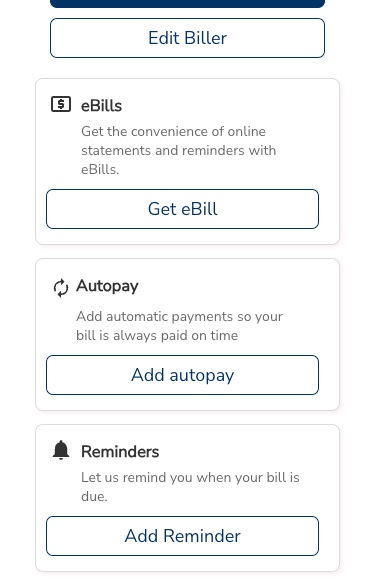
2. On the Biller Details page, select the “Add Reminder” button.
![Set up reminder using Bill Pay]()
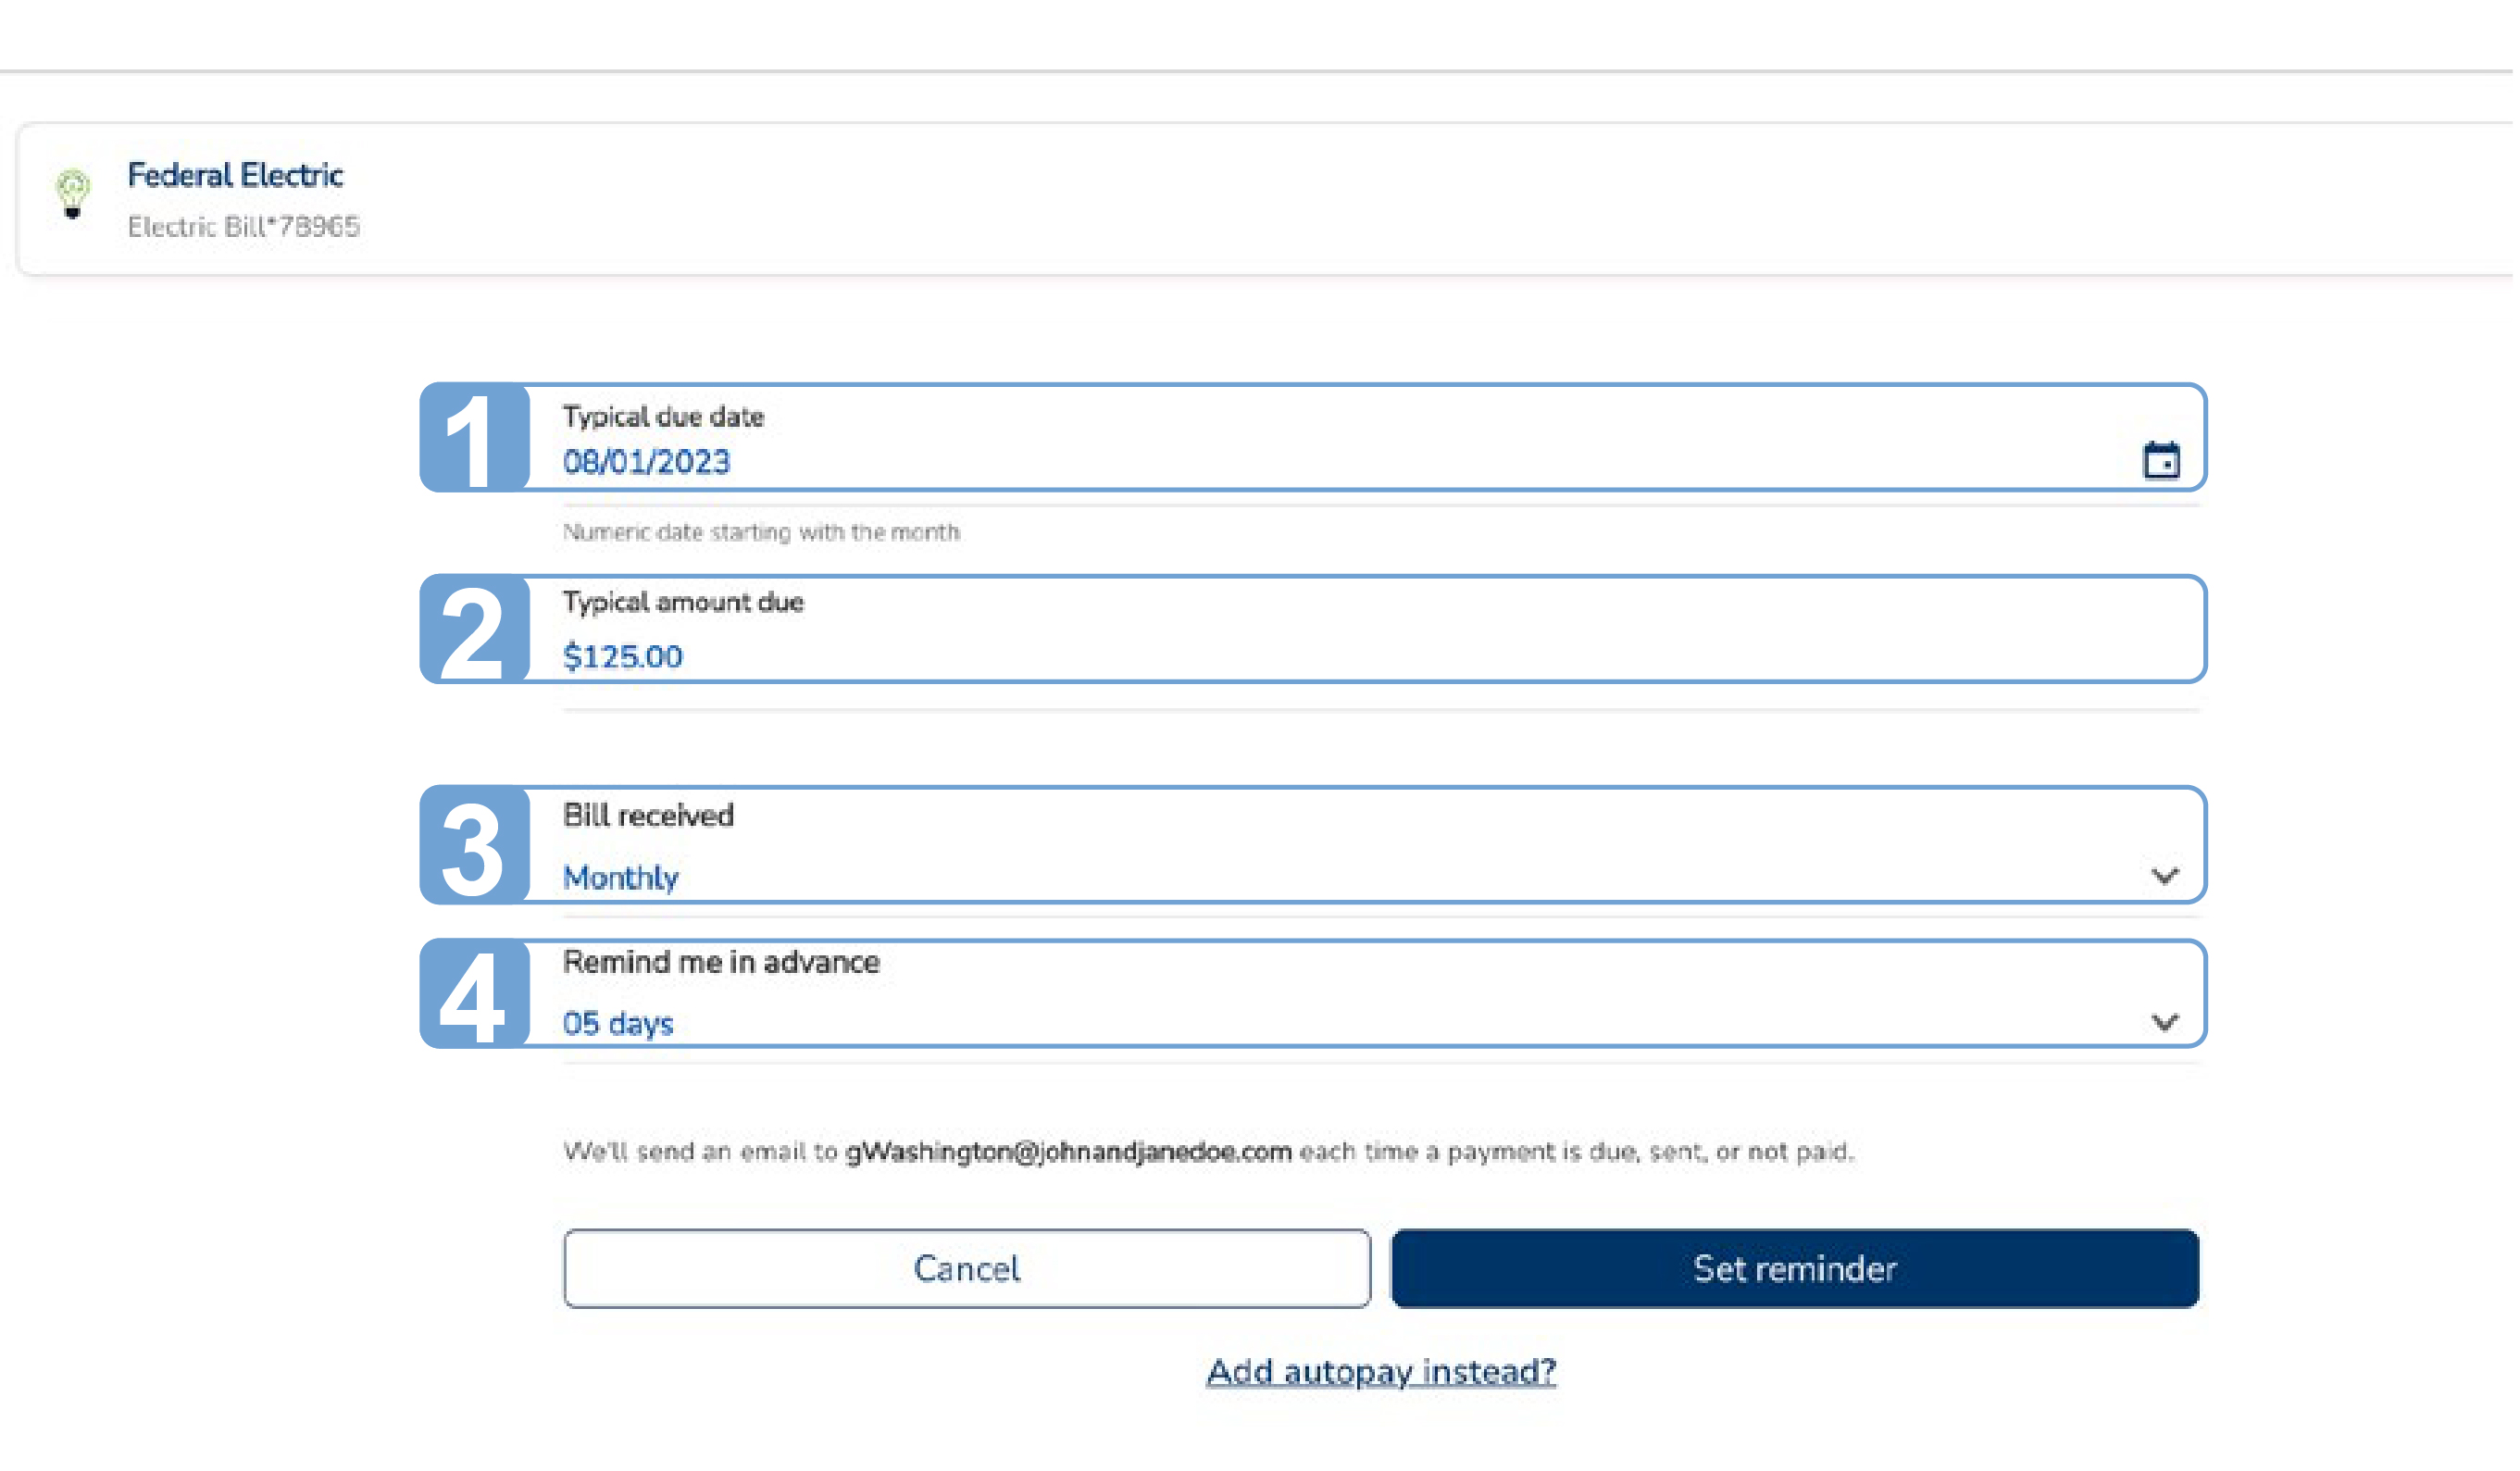
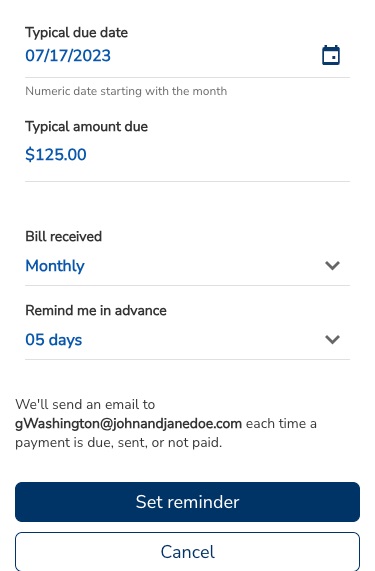
3. Select the bill’s Typical due date.
4. Type in the Typical amount due.
5. Select the Bill received frequency.
6. Select a Remind me in Advance option.
7. When all the information has been entered, select the “Set reminder” button.![Set up reminder using Bill Pay]()
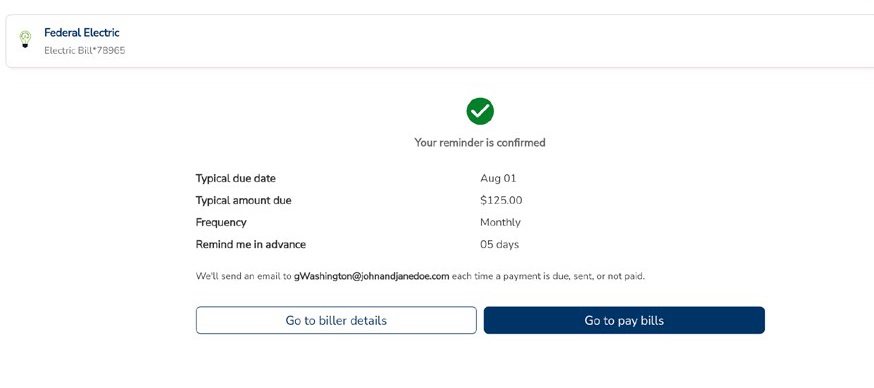
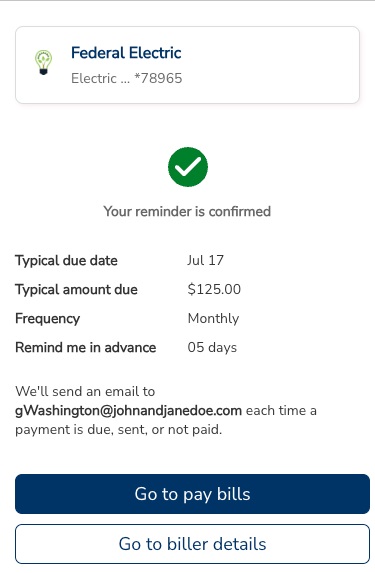
You will see a confirmation for your new Reminder.
![Set up a reminder using Bill Pay]()
Mobile View 1. Select a biller from “My billers” that does not already have eBills or Autopay set up.
![Set up a reminder using Bill Pay]()
2. On the Biller Details page, select the “Add Reminder” button.
![Set up reminders using Bill Pay]()
3. Select the bill’s Typical due date.
4. Type in the Typical amount due.
5. Select the Bill received frequency.
6. Select a Remind me in Advance option.
7. When all the information has been entered, select the “Set reminder” button.![Set up reminders using Bill Pay]()
You will see a confirmation for your new Reminder.
![Set up a reminder using Bill Pay]()
-
Request and Pay an eBill
With eBills, you can receive, manage and pay bills from the same place! Forget the trips to the mailbox and buying stamps.
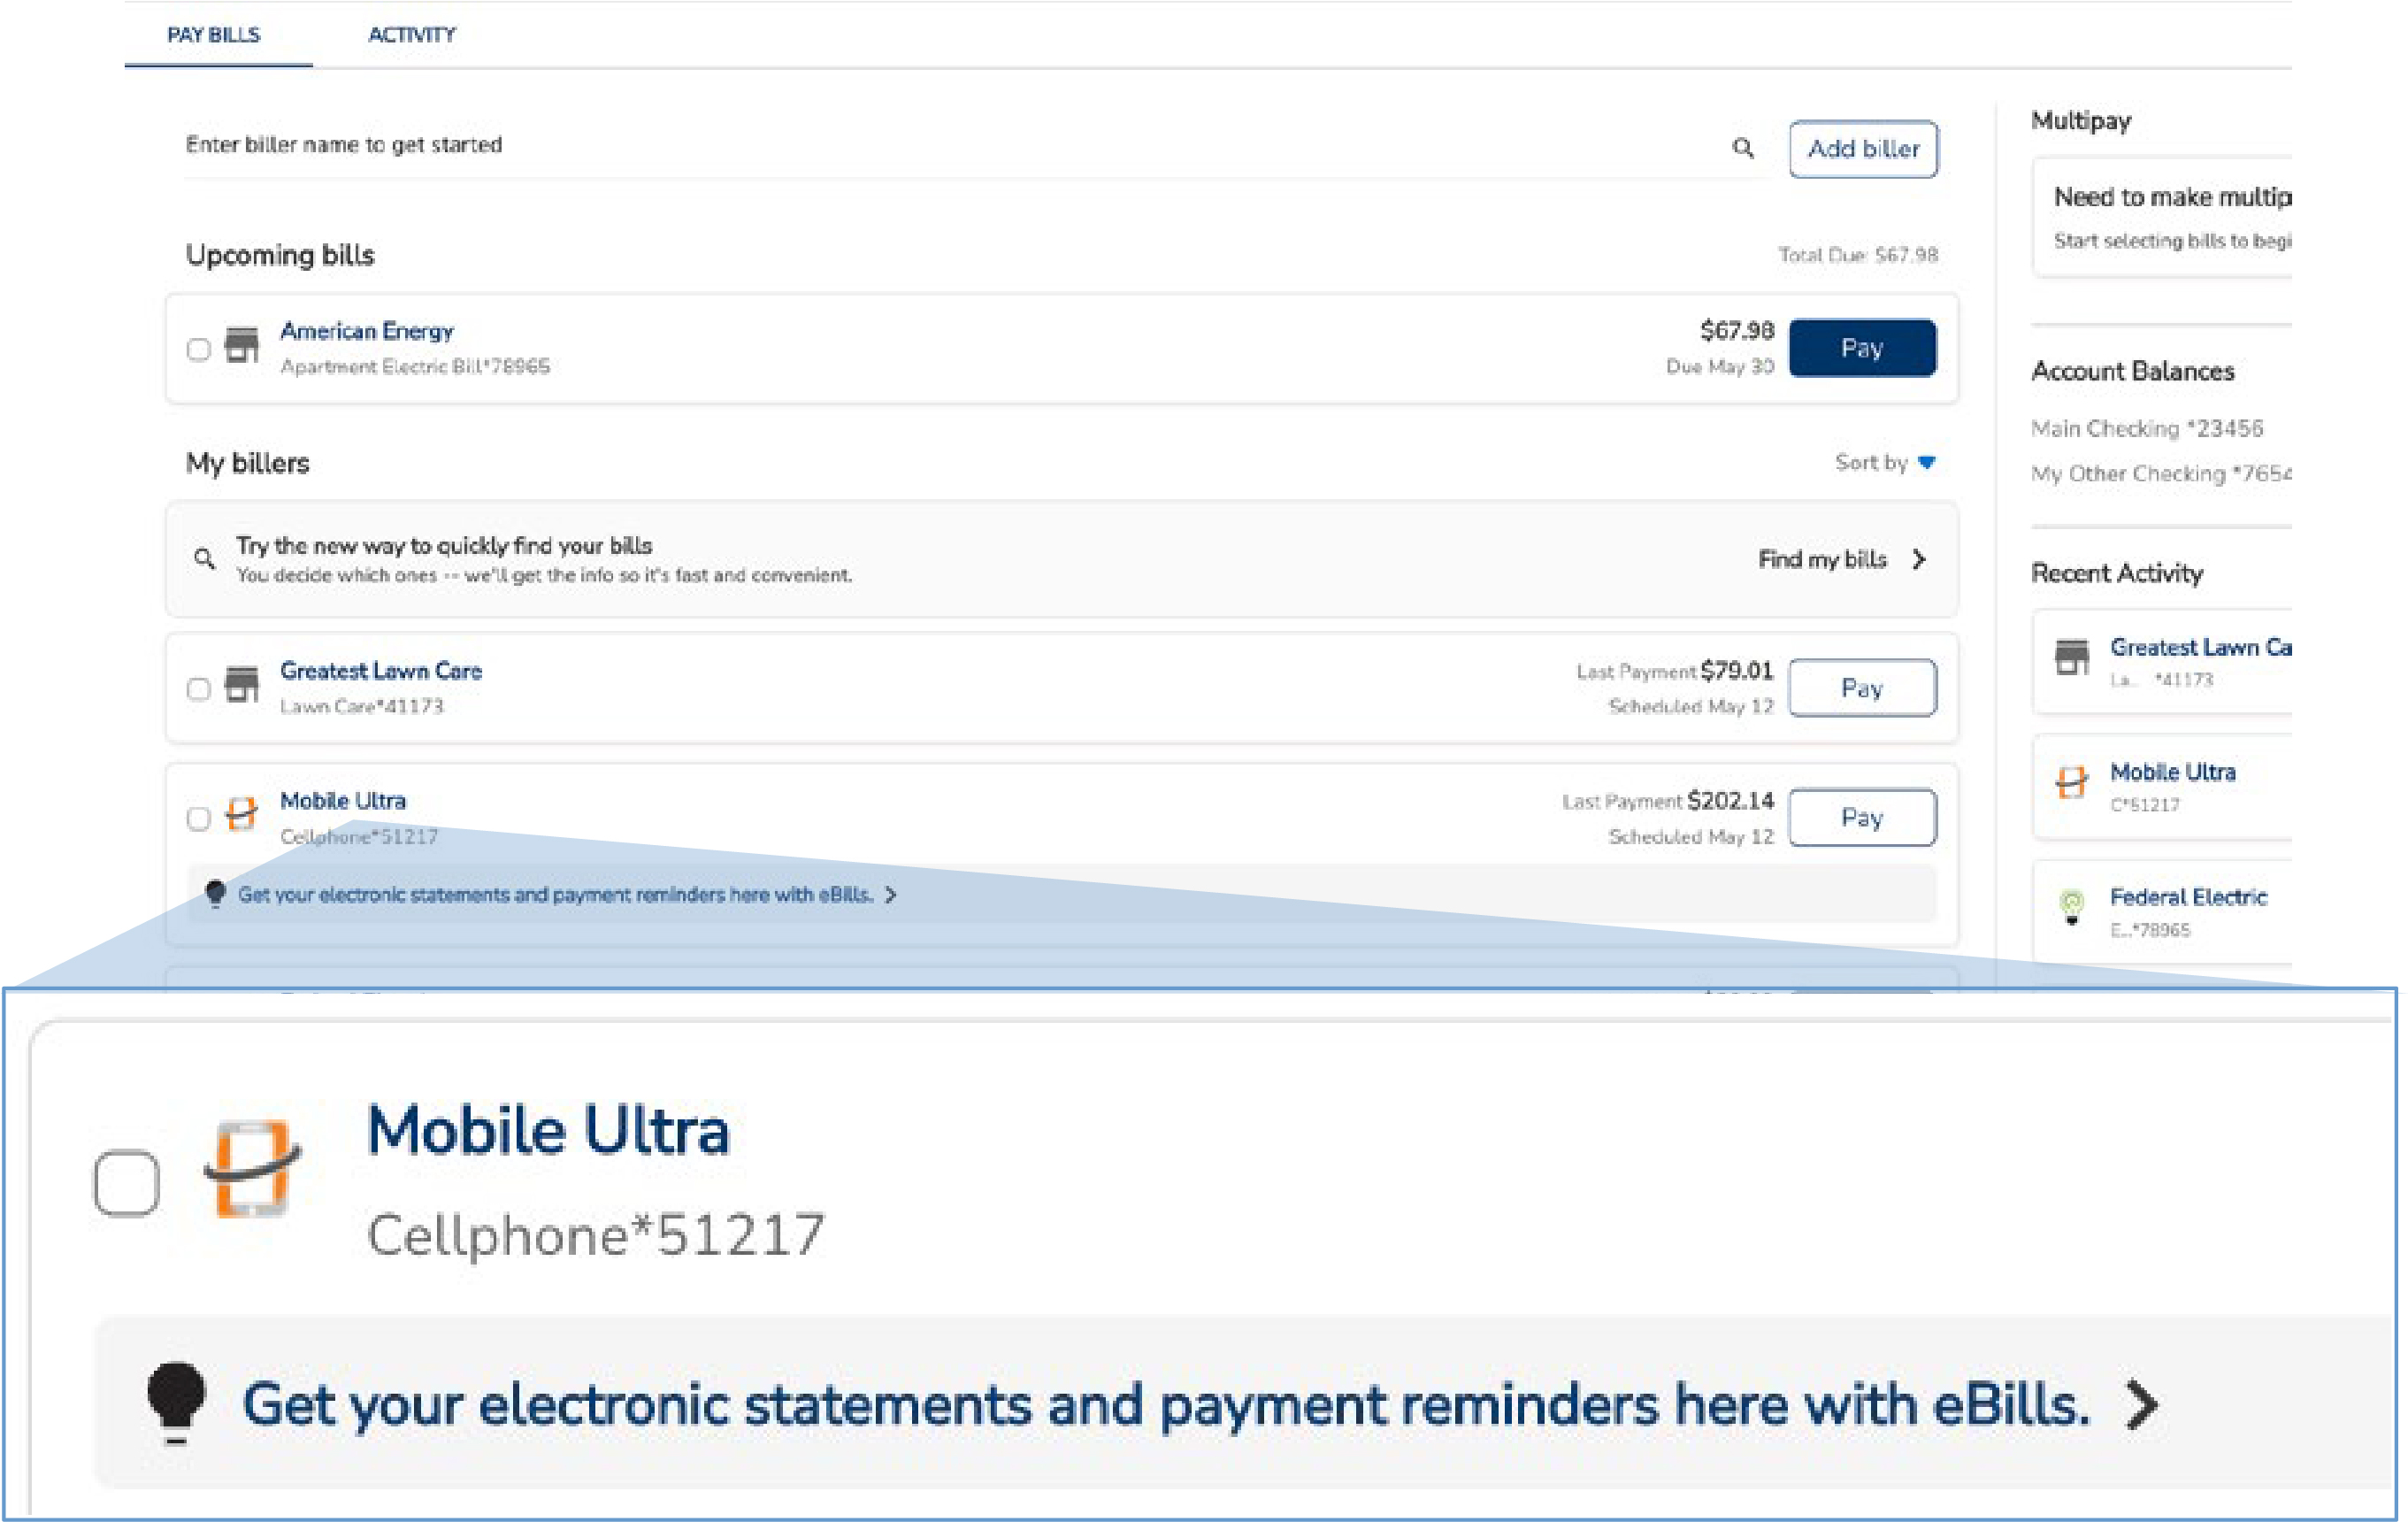
Desktop View eBills are electronic statements that you can request to arrive directly in your payment center each month.
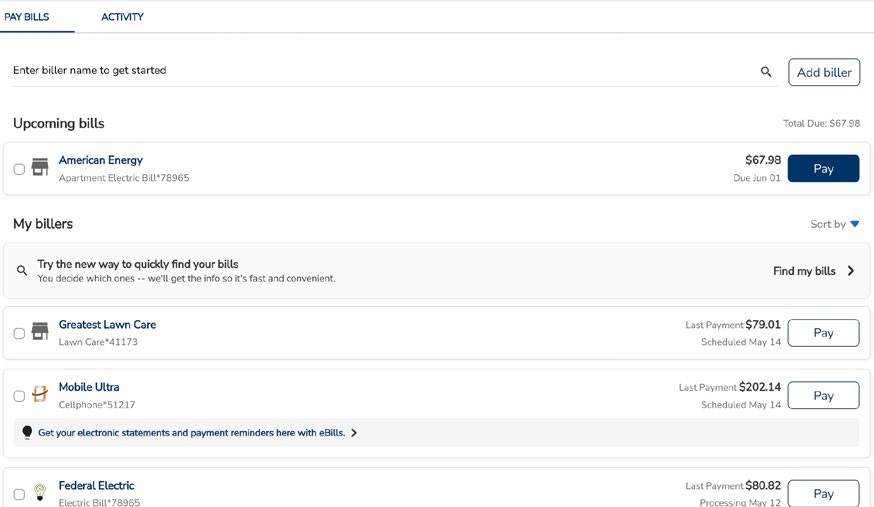
1. Select the eBills link below the biller to request your electronic statement.
![eBill desk top view]()
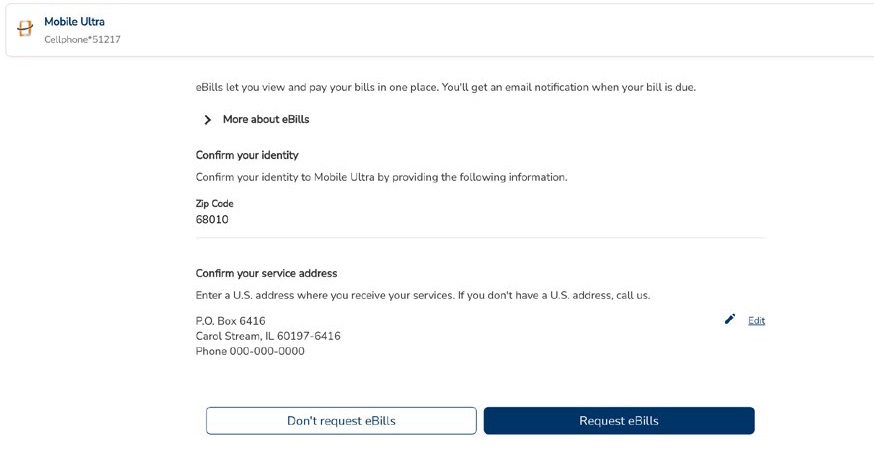
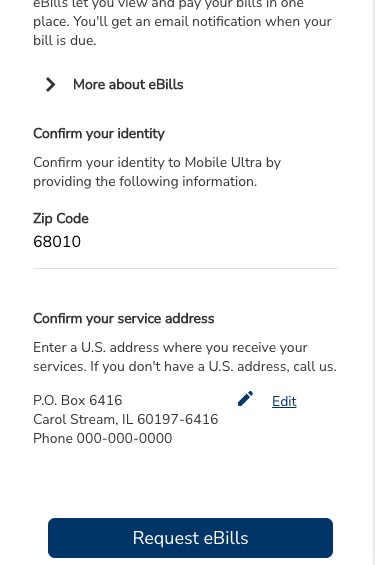
2. Confirm your identity and services address. Then select “Request eBills.”
![Request and pay an eBill]()
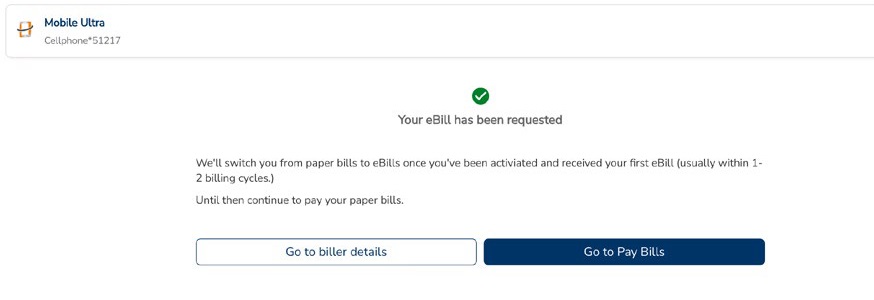
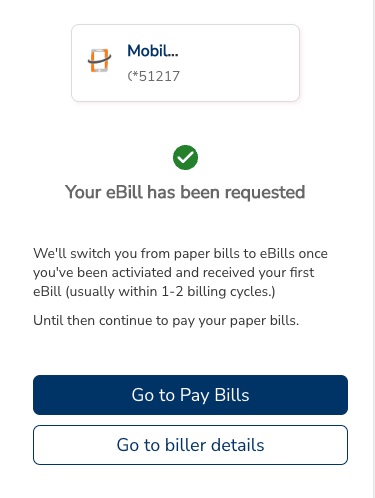
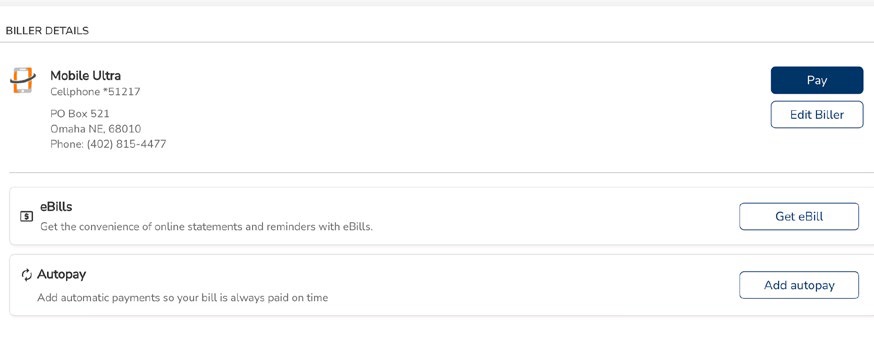
3. From the eBill confirmation screen, select “Go to biller details” if modifications are needed, or select “Go to Pay Bills” to see a complete list of bills.
![Request and pay an eBill]()
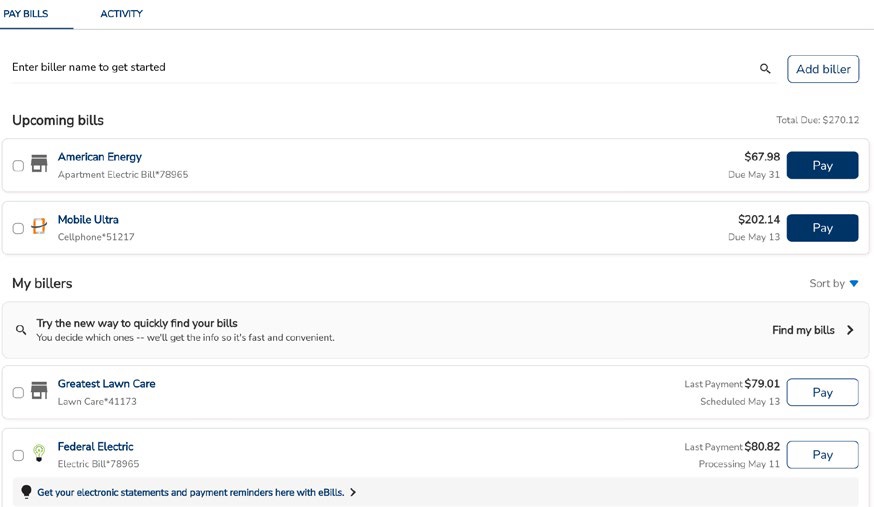
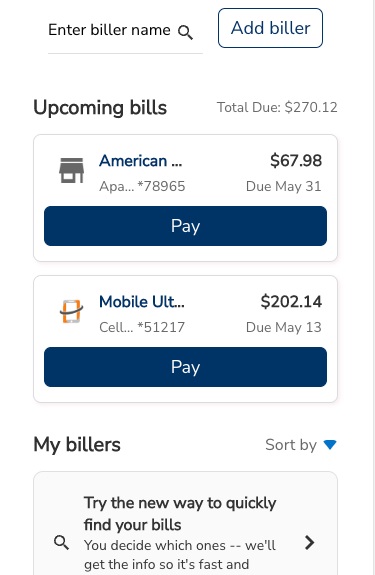
4. After one or two billing cycles, the eBill will show up in the Upcoming bills section. Select “Pay” to make a payment.
![Request and pay an eBill]()
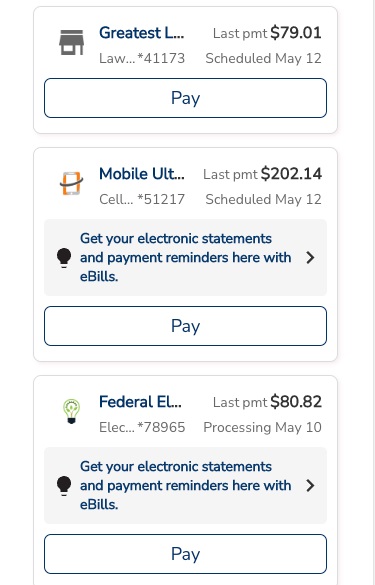
Mobile View 1. Select the eBills link below the biller to request your electronic statement.
![Request and pay an eBill]()
2. Confirm your identity and services address. Then select “Request eBills.”
![Request and pay an eBill]()
3. From the eBill confirmation screen, select “Go to biller details” if modifications are needed, or select “Go to Pay Bills”to see a complete list of bills.
![Request and pay an eBill]()
4. After one or two billing cycles, the eBill will show up in the Upcoming bills section. Select“Pay” to make a payment.
![Request and pay an eBill]()
-
Set up an Automatic Payment
Set it and forget it! Automatic payments are perfect for those monthly bills that are the same amount.
Desktop View 1. Select the biller you'd like to set up with autopay from the My billers list.
![Set up an automatic payment]()
2. Select “Add autopay.” If the biller has been set up with eBills, you will have the option to pay the amount due or a fixed amount for your autopayments.
![Set up an automatic payment]()
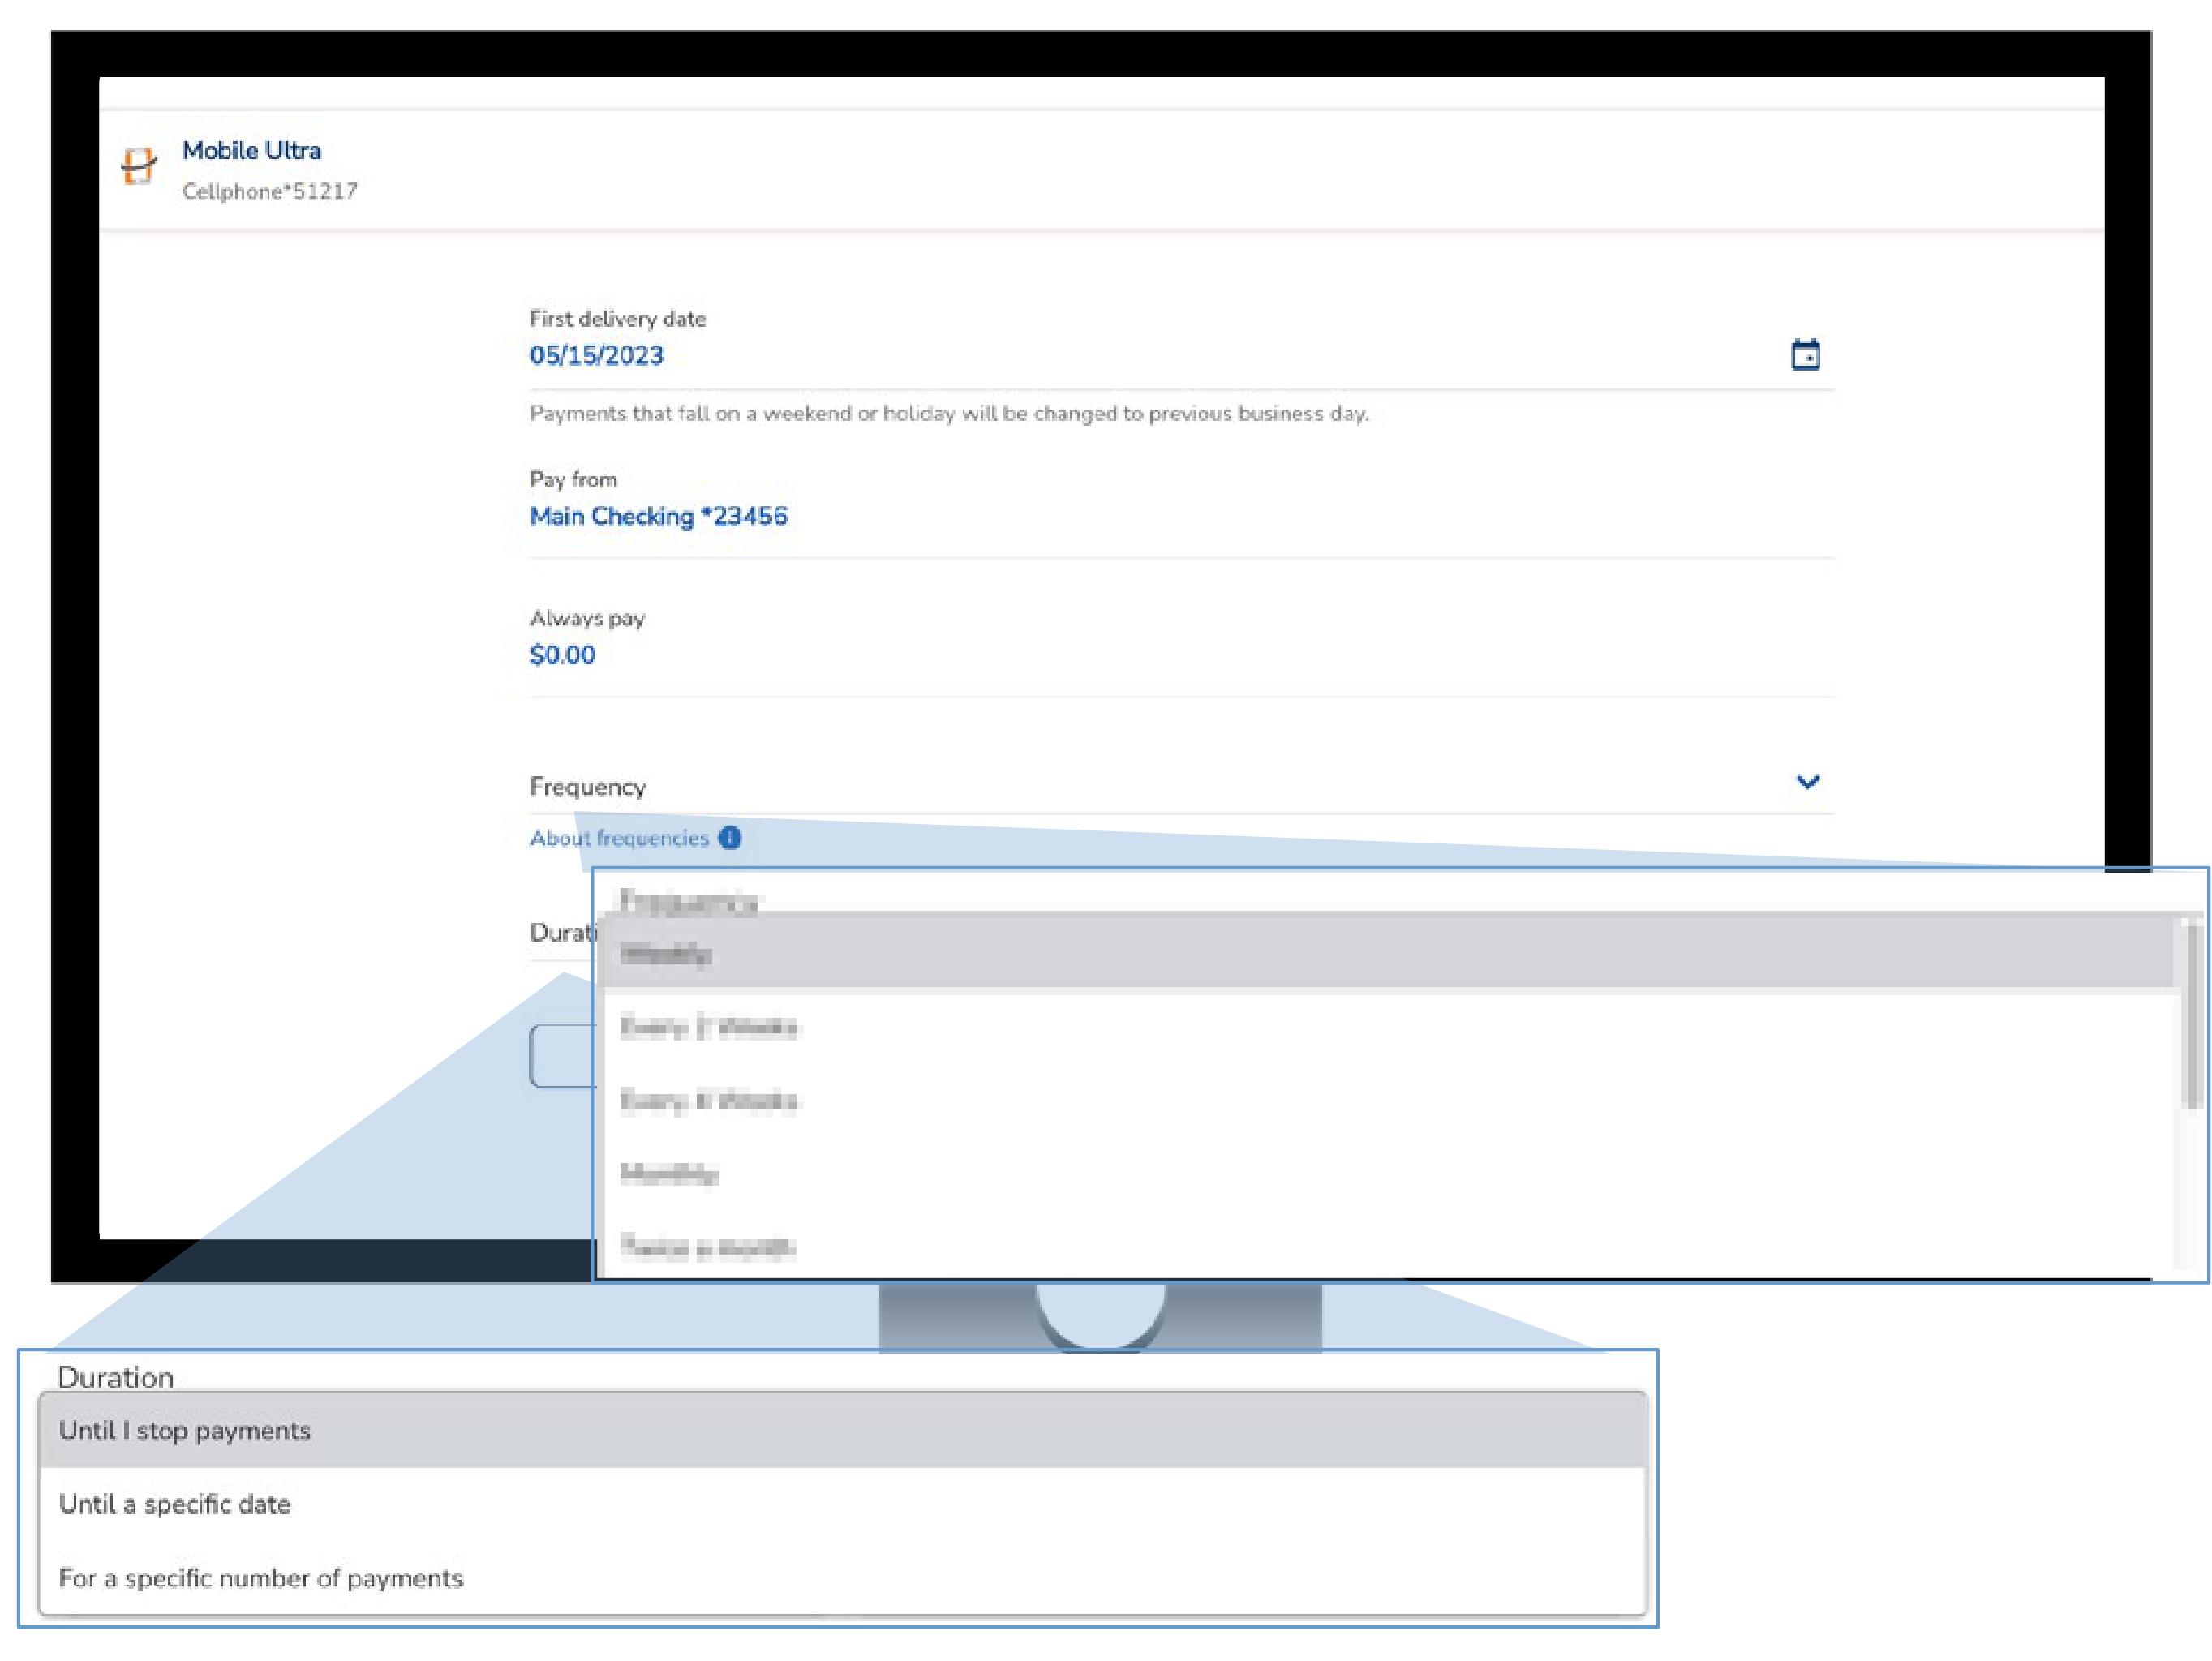
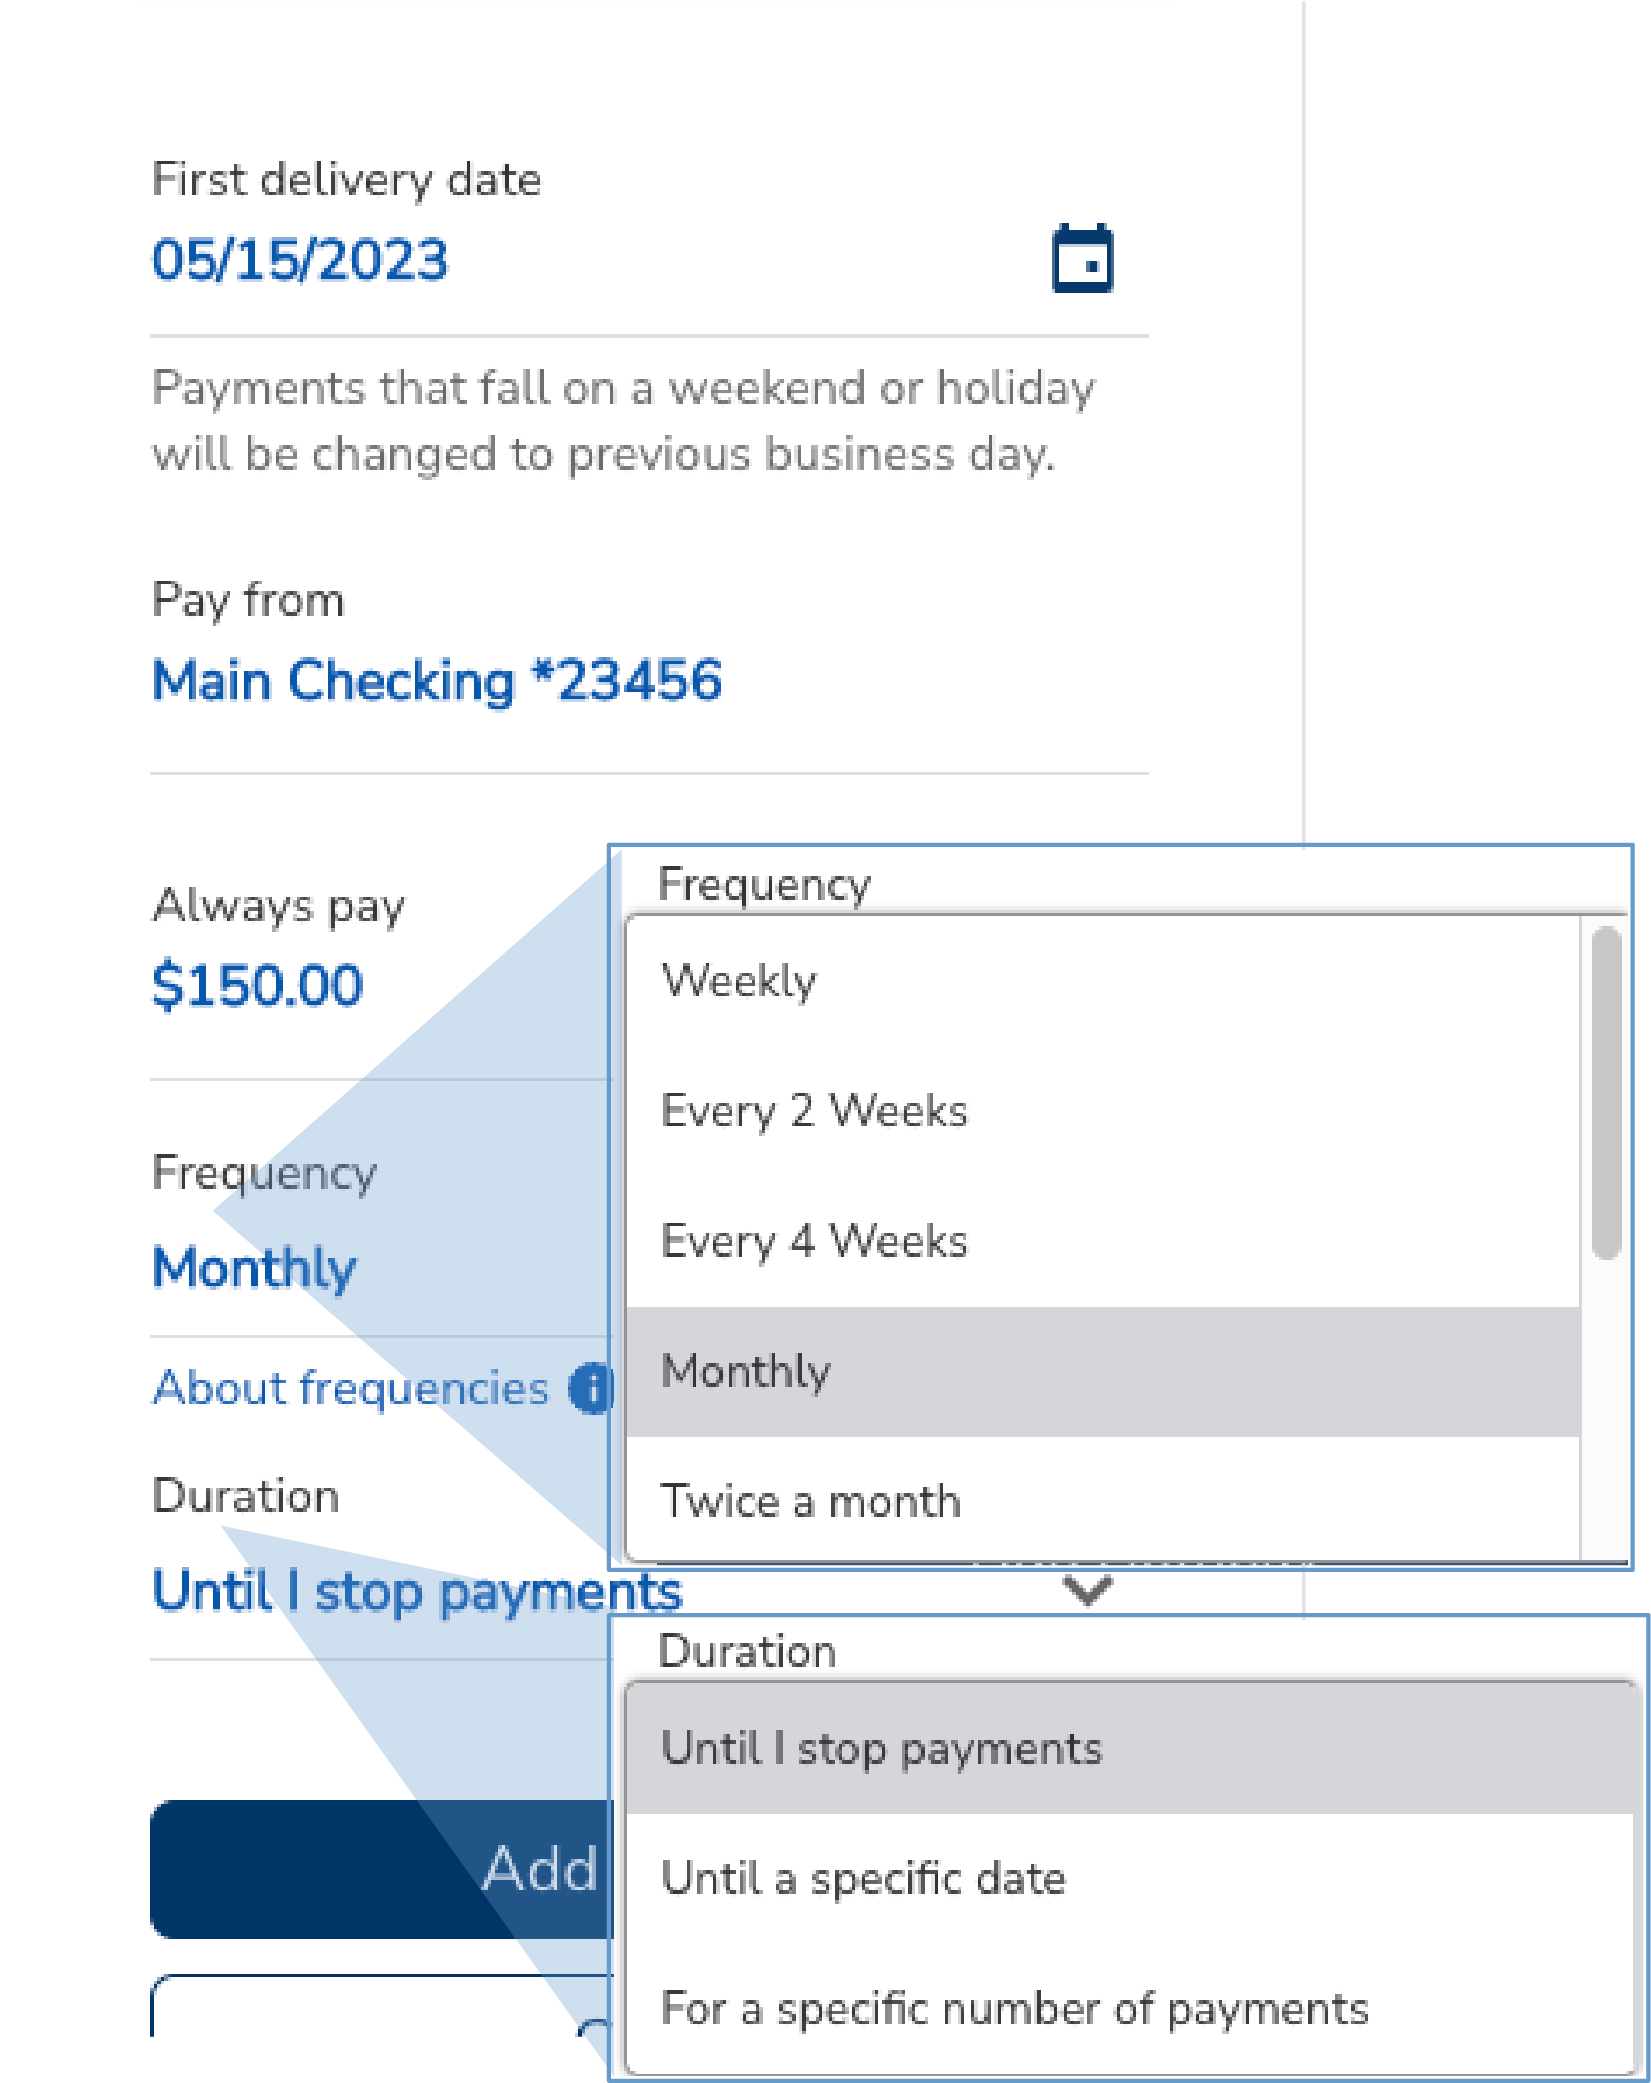
3. Select the First delivery date by clicking on the calendar icon.
4. Select the Pay from account.
5. Enter the amount to Always pay.
6. Chose a Frequency from the drop-down menu.
7. Chose a Duration from the drop-down menu.
8. Select “Add Autopay.”![Set up Automatic Payment Desktop view]()
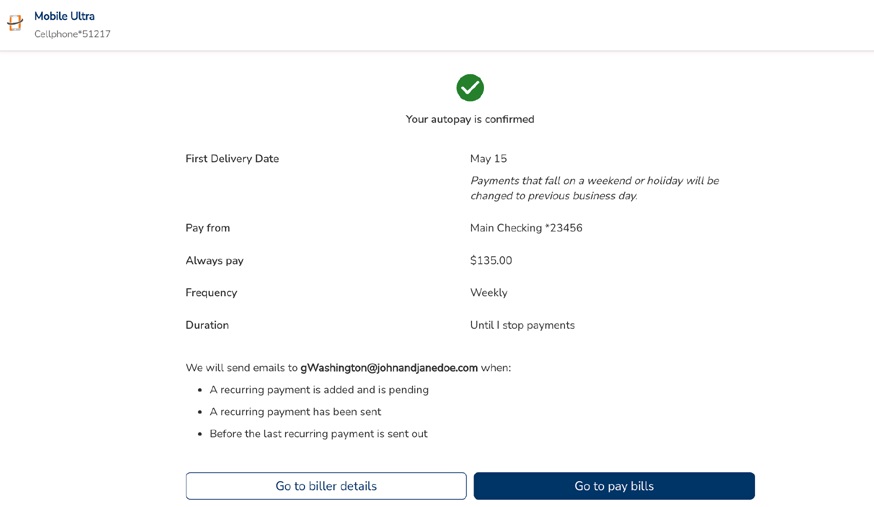
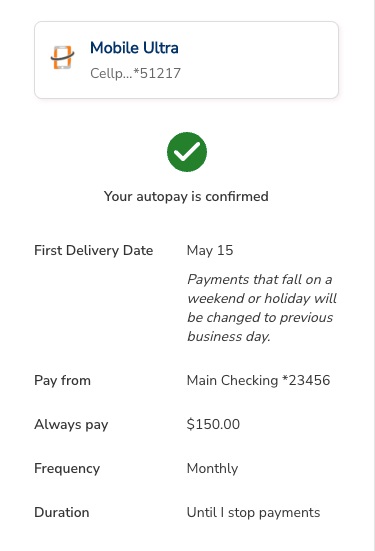
9. Verify the Autopay details. Select “Go to biller details” if you need to make modifications or “Go to pay bills” to return to the payment center.
![Set up an automatic payment]()
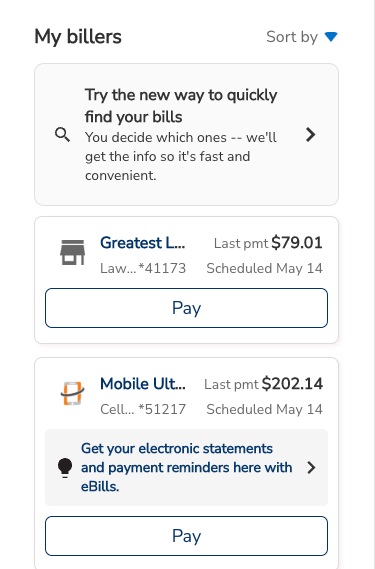
Mobile View 1. Select the biller you'd like to set up with autopay from the My billers list.
![Set up an automatic payment]()
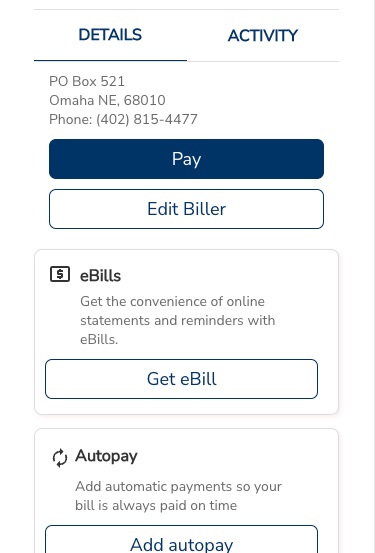
2. Select “Add autopay.” If the biller has been set up with eBills, you will have the option to pay the amount due or a fixed amount for your autopayments.
![Set up an automatic payment]()
3. Select the First delivery date by clicking on the calendar icon.
4. Select the Pay from account.
5. Enter the amount to Always pay.
6. Chose a Frequency from the drop-down menu.
7. Chose a Duration from the drop-down menu.
8. Select “Add Autopay.”![Set up Automatic Payment Mobile Screen View]()
9. Verify the Autopay details. Select “Go to biller details” if you need to make modifications or “Go to pay bills” to return to the payment center.
![Set up an automatic payment]()